Applications built on various tech stacks, written in different languages and framework such that C#, .Net, Java, Node.js and so on. In order to enhance the ability of our application, It’s often a faster way to get things done by using any open source library or third-party component instead of written by ourselves. But, to consume or host libraries we require a public or private space that can be called as registry which used to store them. In this blog post, we are going to discuss how to use Azure Pipelines and Artifacts for package management, hosting, reuse and share dependent packages in an artifact that we control.
Azure Artifacts for Package Management
This blog post is all about:
- What is Azure Artifacts
- Benefits of using Azure Artifacts
- How to connect to Azure Artifacts
- Creating and Publishing a NuGet package
- Automate the versioning of a NuGet package
- Importing NuGet package
- Publish NuGet Package using Azure Pipelines
What is Azure Artifacts?
Azure Artifact is the place where we can store and consume our Maven, npm or NuGet packages from different feeds. Those packages can be shared with people in a team, an organization and even publicly. It is an extension to Azure DevOPS integrated with build and release pipelines across Azure DevOPS.
Benefits of using Azure Artifacts
There’s a lot of cool benefits to store your own packages. One of the benefit is, it can even cache the public packages that you use. For example a very common package “Serilog“. If for some reason, nuget.org goes down then we still have access to “Serilog” for our projects and we can do build with it.
How to connect to Azure Artifacts?
Setup a Project in Azure DevOPS
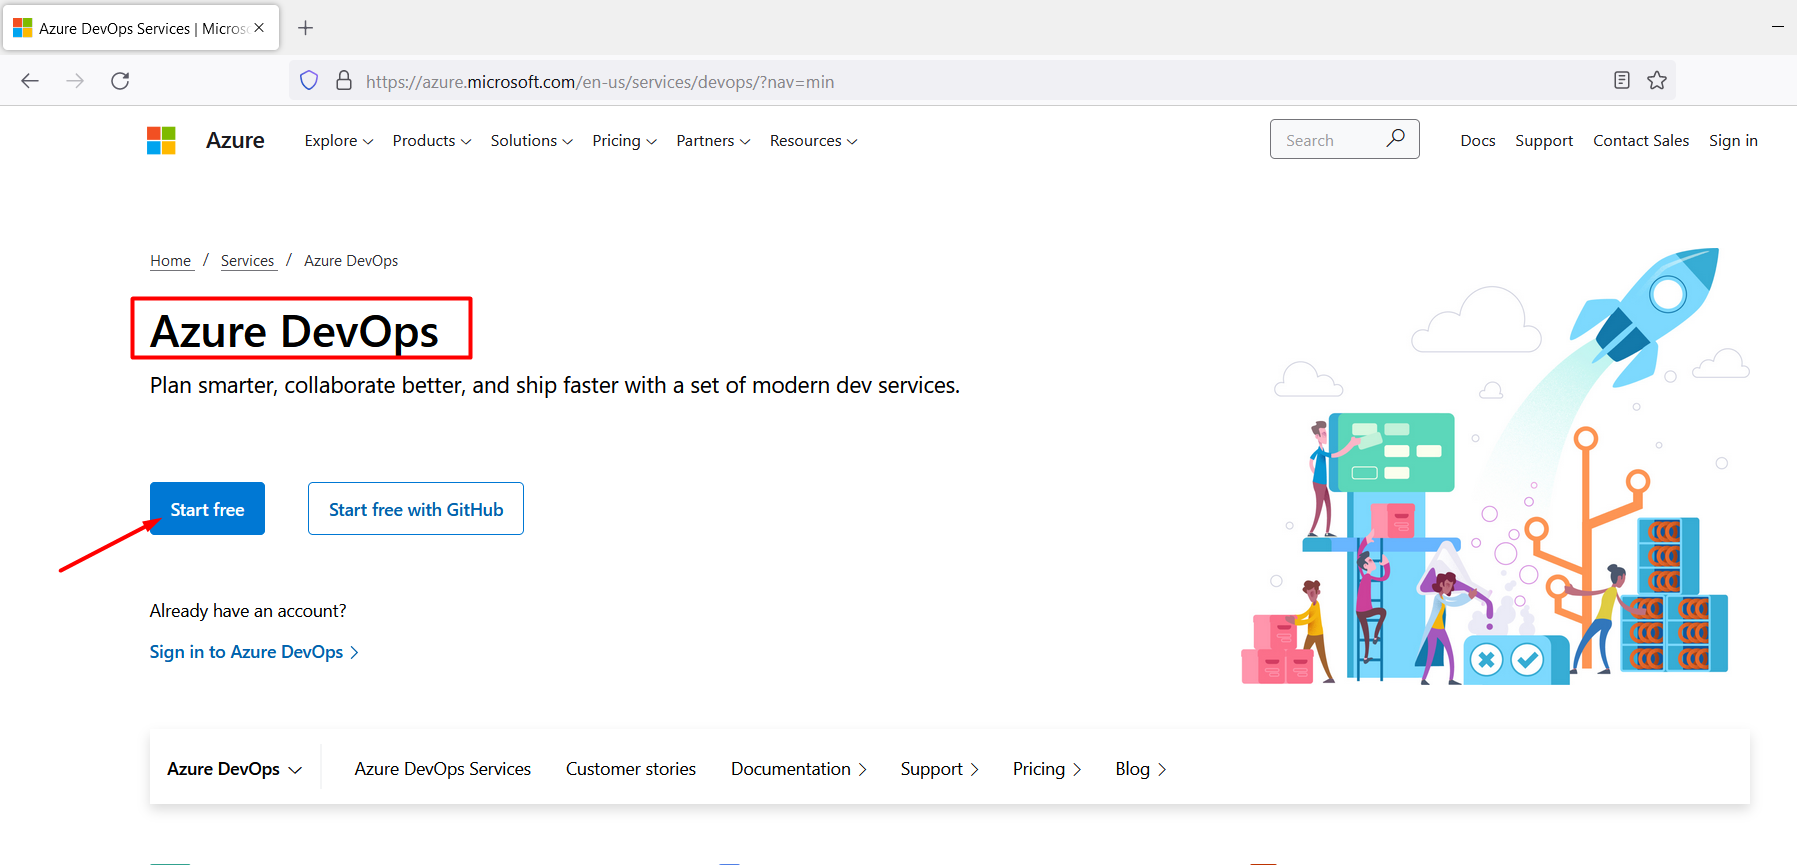
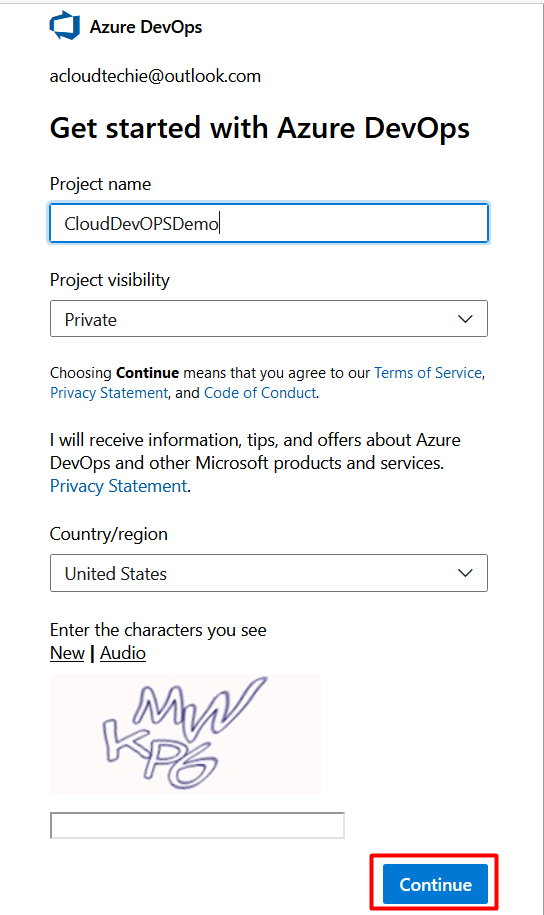
Head to https://dev.azure.com and Click on button “Start free” as shown in Figure 1. If this is your first time signing into Azure DevOPS then you’ll be asked to provide information for initial setup. Fill in the details and click on “Continue” as shown in Figure 2.
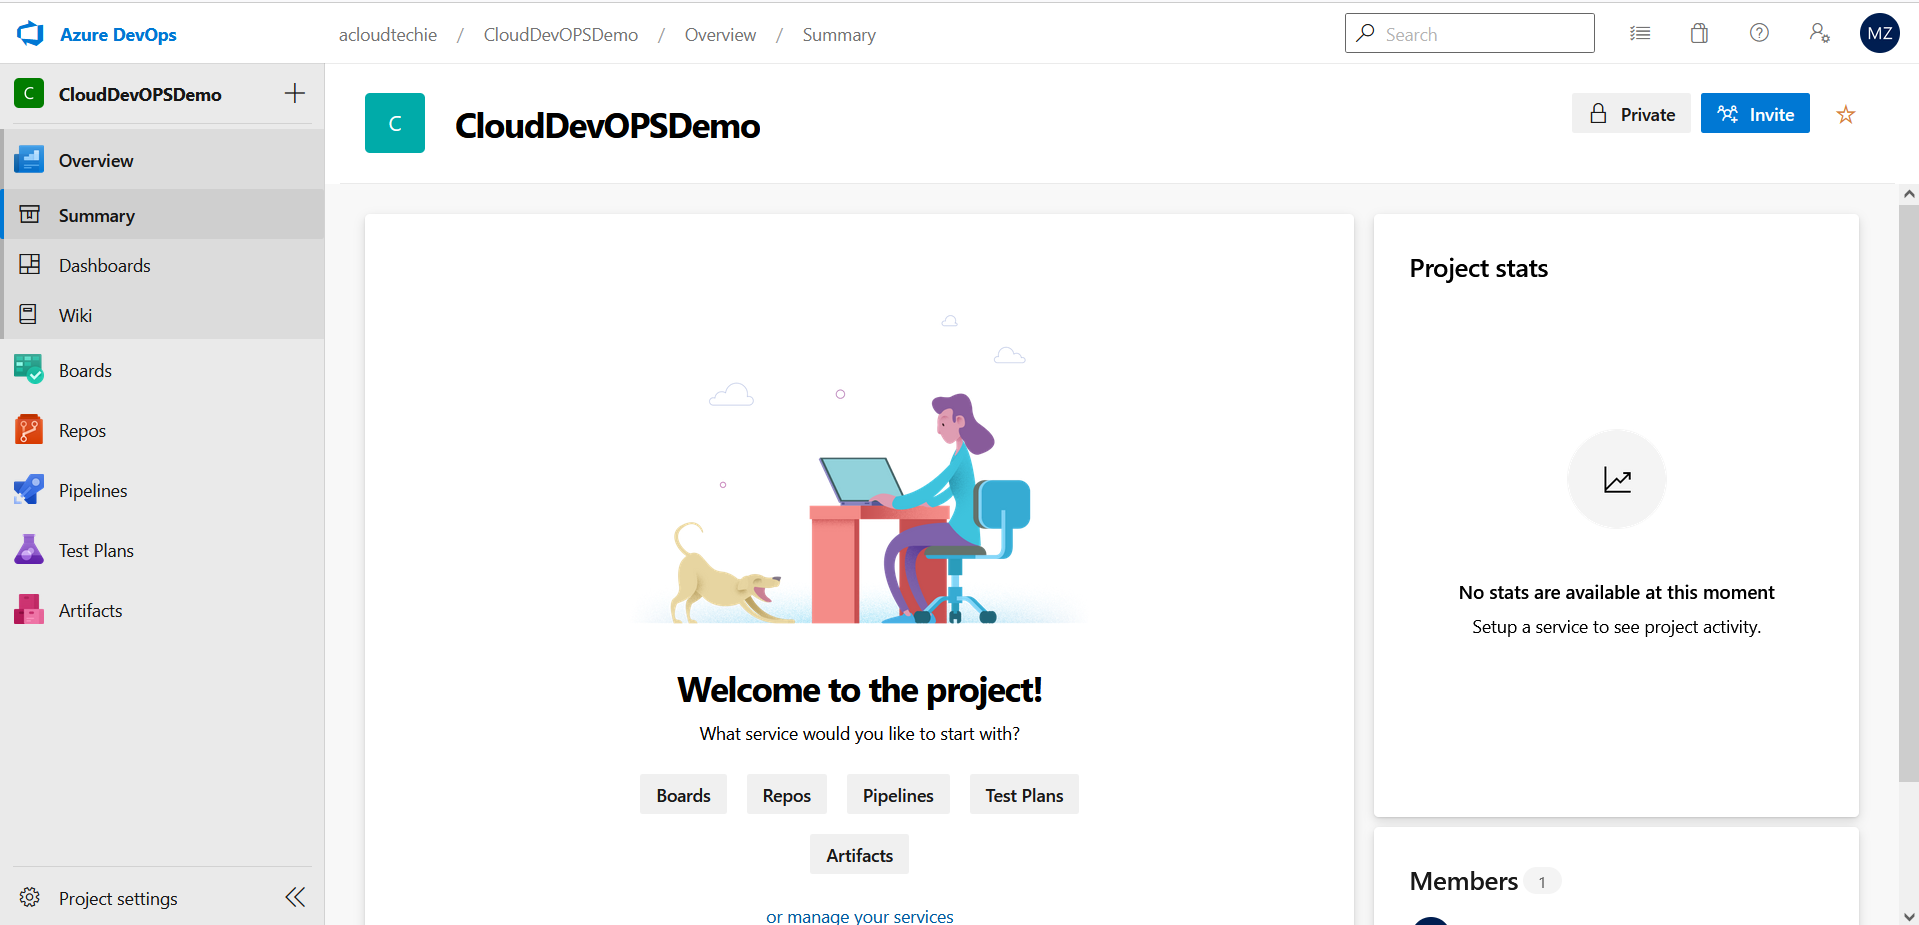
Once everything is setup, you will be redirect to the “Summary” page as shown in Figure 3.
Create and Connect to a Feed
Create a Feed
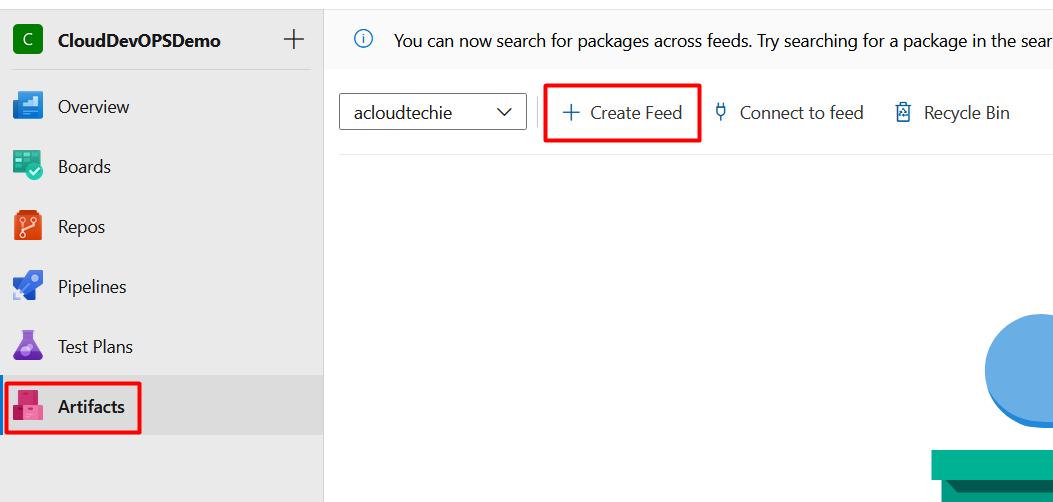
Click on “Artifacts” icon from menu bar on left side and select “Create Feed” as shown in Figure 4. This feed will be a collection of packages available to the users within the Organization. Since we will be using this feed for NuGet packages so it will sit alongside public NuGet feed as peer.
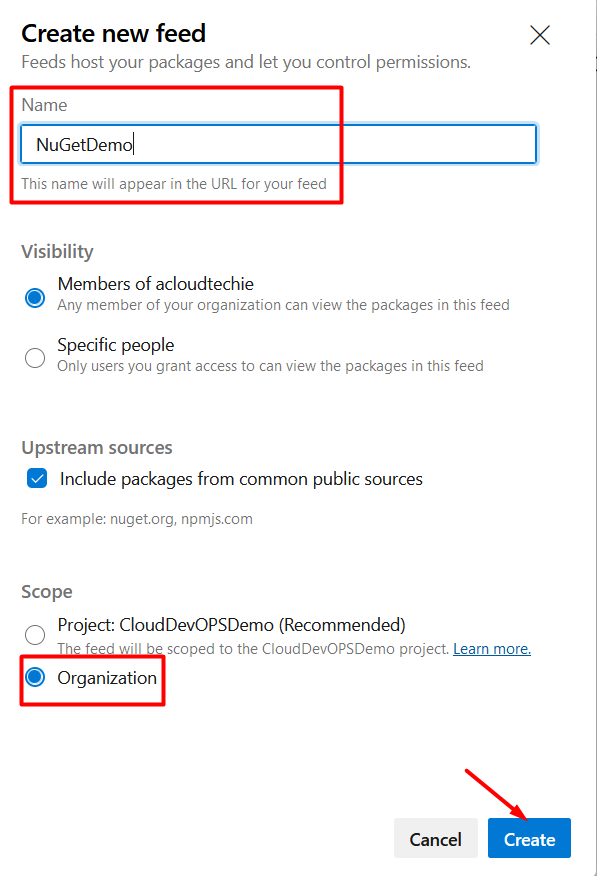
This feed will contain NuGet demo and common functionality that can be shared across projects in an Organization. Select “Organization” as the scope, set the name to “NuGetDemo” and click Create. Leave default options as it is as shown in Figure 5.
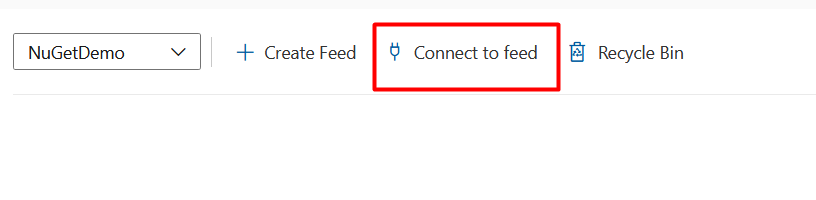
Connect to Feed
In order to connect to this feed, you must configure your environment.
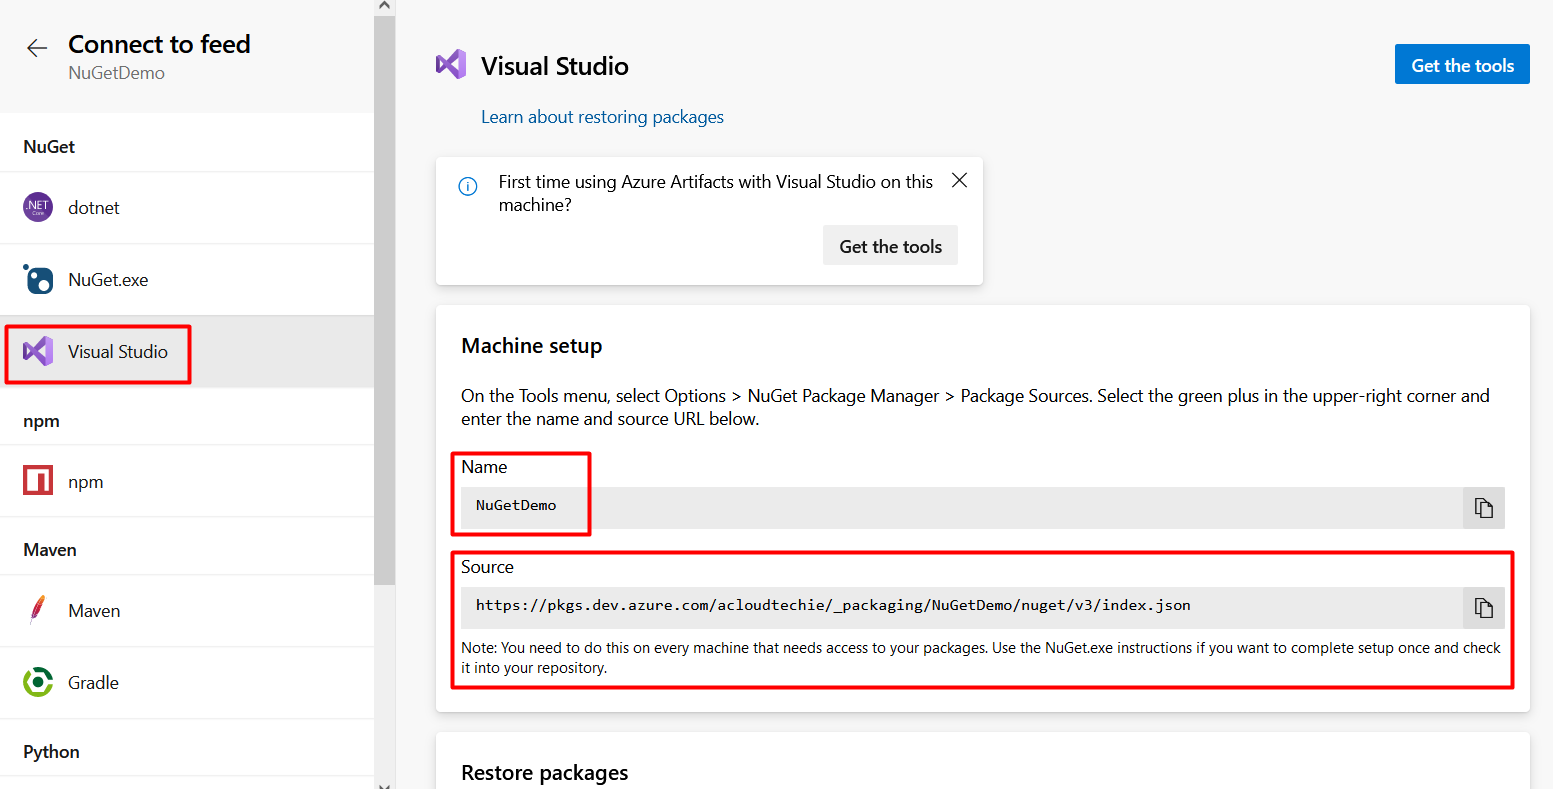
Click Connect to Feed > Select Visual Studio > Copy Source url as shown in Figure 6 and 7. This source url is required to configure in Visual Studio and start taking an advantage of this (NuGetDemo) Feed. Leave the dialogue open in browser.
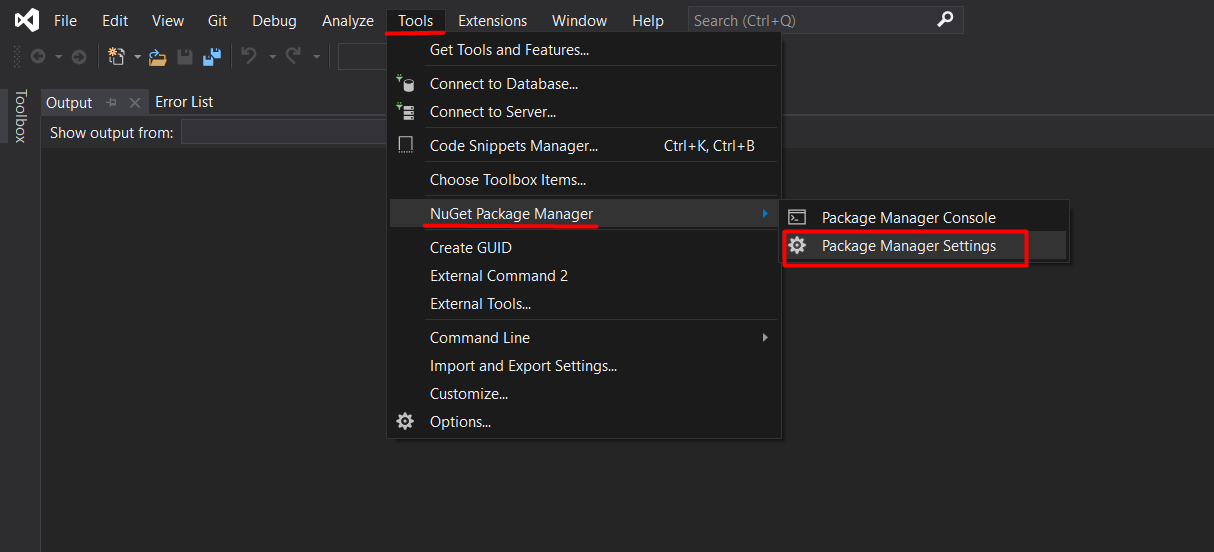
Launch a new instance of Visual Studio > Select Tools > NuGet Package Manager > Package Manager Settings as shown in Figure 8.
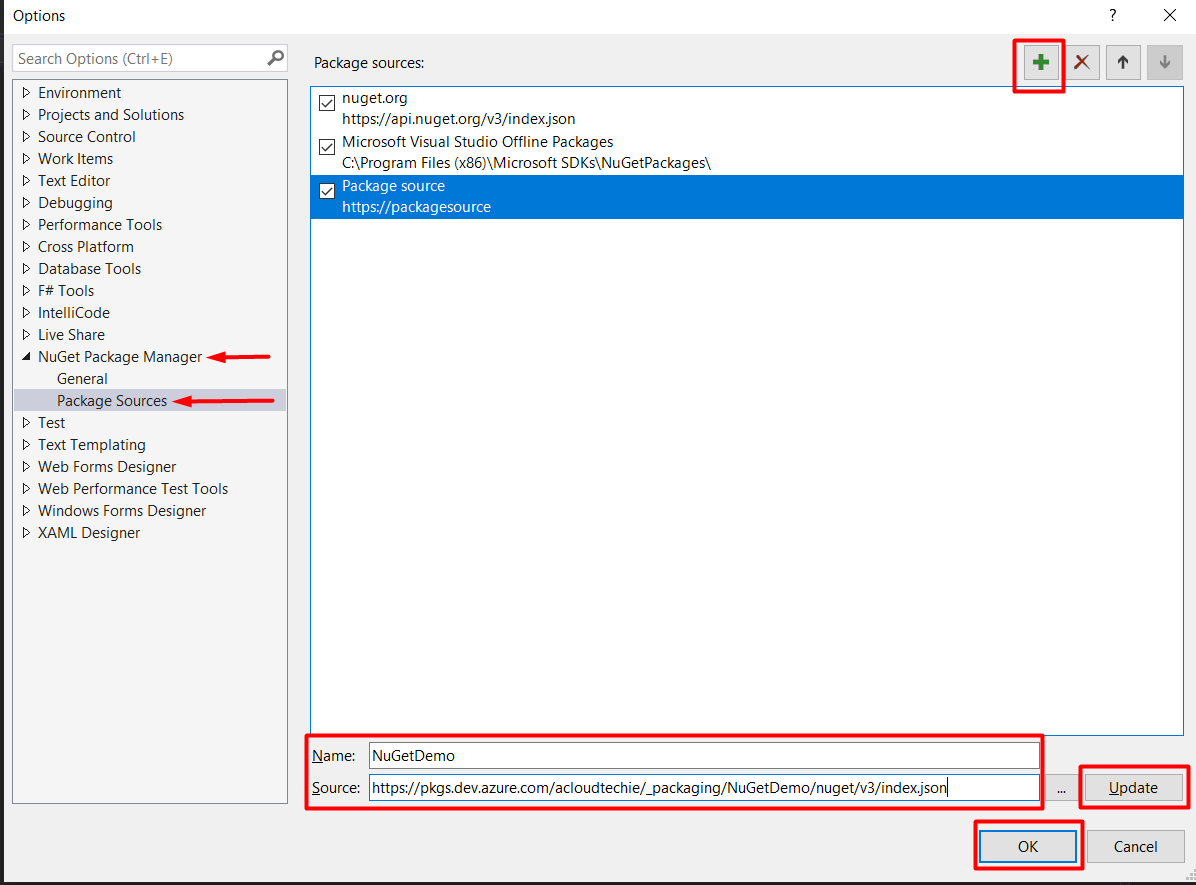
Search for Package Source > Click on “+” button to add the source > Select newly added source > Set the Name to “NuGetDemo” > Paste the Source URL copied earlier > Click on Update and OK as shown in Figure 9. Now, Visual Studio is connected to the feed.
Creating and Publishing a NuGet Package
Creating a NuGet Package
.Net standard library can target a number of different platforms. for example, Android, iOS, Linux, Windows etc.
Follow along the section below to see how we created a Helper Library named “Calculate”.
- Compile this, get the dll and import it into other project.
- Put a project in this solution.
Since we’ve already created a Helper library, now the time is to build and pack it as NuGet package that can be published to feed in Azure artifacts.
Set NuGet Package values
Before, we had to create a whole configuration file for .NET framework but now there’s a lot easier way to do this configuration.
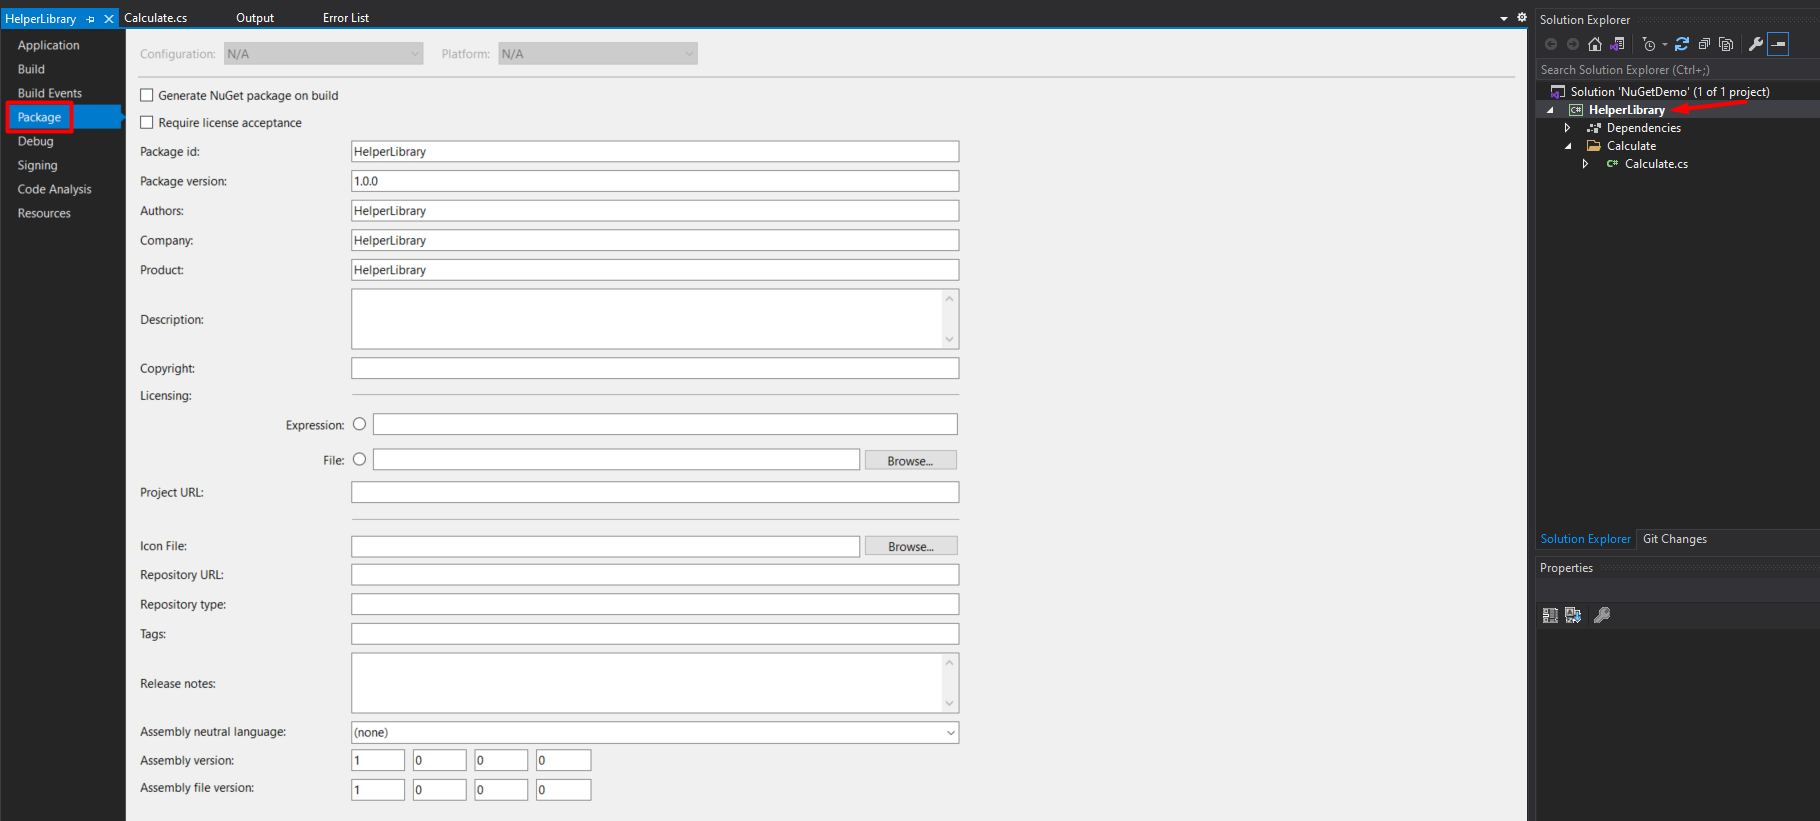
Return to Visual Studio > Right Click on HelperLibrary node > Select Properties > Select Package as shown in Figure 10.
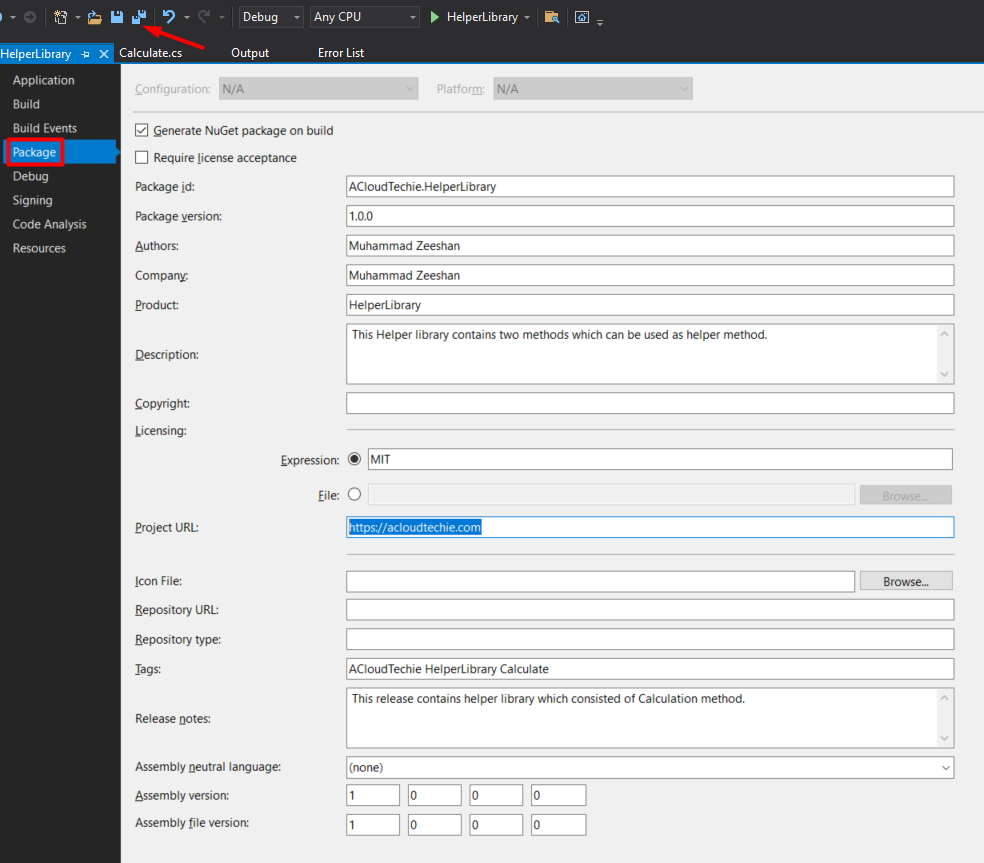
Here’s what I did in this demo as shown in Figure 11.
- Select check box Generate NuGet package on build
- Package id > ACloudTechie.HelperLibrary
- This will be kind of namespace and if for instance, I add another library then it will be something like ACloudTechie.LoggerLibrary.
- Note: Underscore, dashes or spaces are not allowed so only use “.”(dot)
- Package version > 1.0.0
- This will be the versioning of your package. Here we are using simple (manual) technique to add the version. However, in this section we will using Azure Pipelines for versioning of our NuGet package.
- We will use semantic versioning also known as “SemVer“.
- We would never have a gap between versioning, meaning 1.0.1 and 1.0.3 we don’t go for that.
- Expression > MIT
- MIT is a short and simple permissive license which allows anyone to do whatever they want with the code.
- Project URL > It could be anything where people can find your packages. I set this as https://acloudtechie.com
- Icon File > You can browse Icon file here.
- Repository URL > We don’t have any so leaving to default.
- Repository type > Same as above
- Tags > This is very important. It helps people to find your package. This is Space delimited so give tag like below:
- ACloudTechie HelperLibrary Calculate
- Release notes > It could be anything.
- Assembly version / Assembly file version > Notice both fields. If I change the value in Package version from 1.0.0 to anything and click off it, the value in these fields will be changed.
- Click Save
It’s Packing Time !

Now, when we Right Click on our package and click pack (as shown in Figure 12) it will start building the project and create the file for us with .nupkg extension that we will publish to feed in Azure Artifacts.
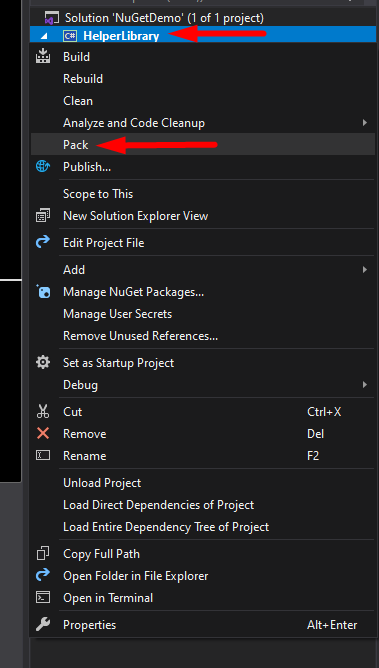
By clicking on Pack, NuGet will build the package based on the information that it was able to pull from project, for example package name and it’s version. i.e. ACloudTechie.HelperLibrary.1.0.0.nupkg.
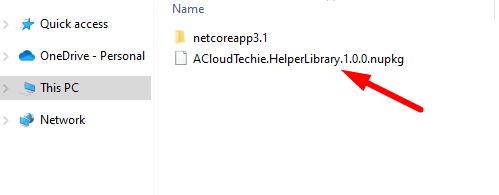
Browse NuGet Package File
Right Click again on project >Open folder in File Explorer >bin >Debug > this is the file we wanted to as shown in Figure 13.
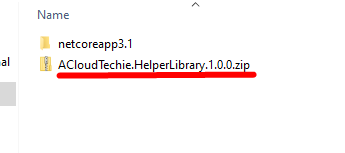
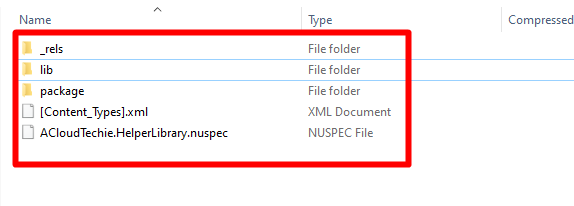
We can even see the content by changing the extension from .nupkg to .zip as shown in Figure 14.
Publishing a NuGet Package
Finally, we have our NuGet package that can be published to feed in Azure Artifacts.
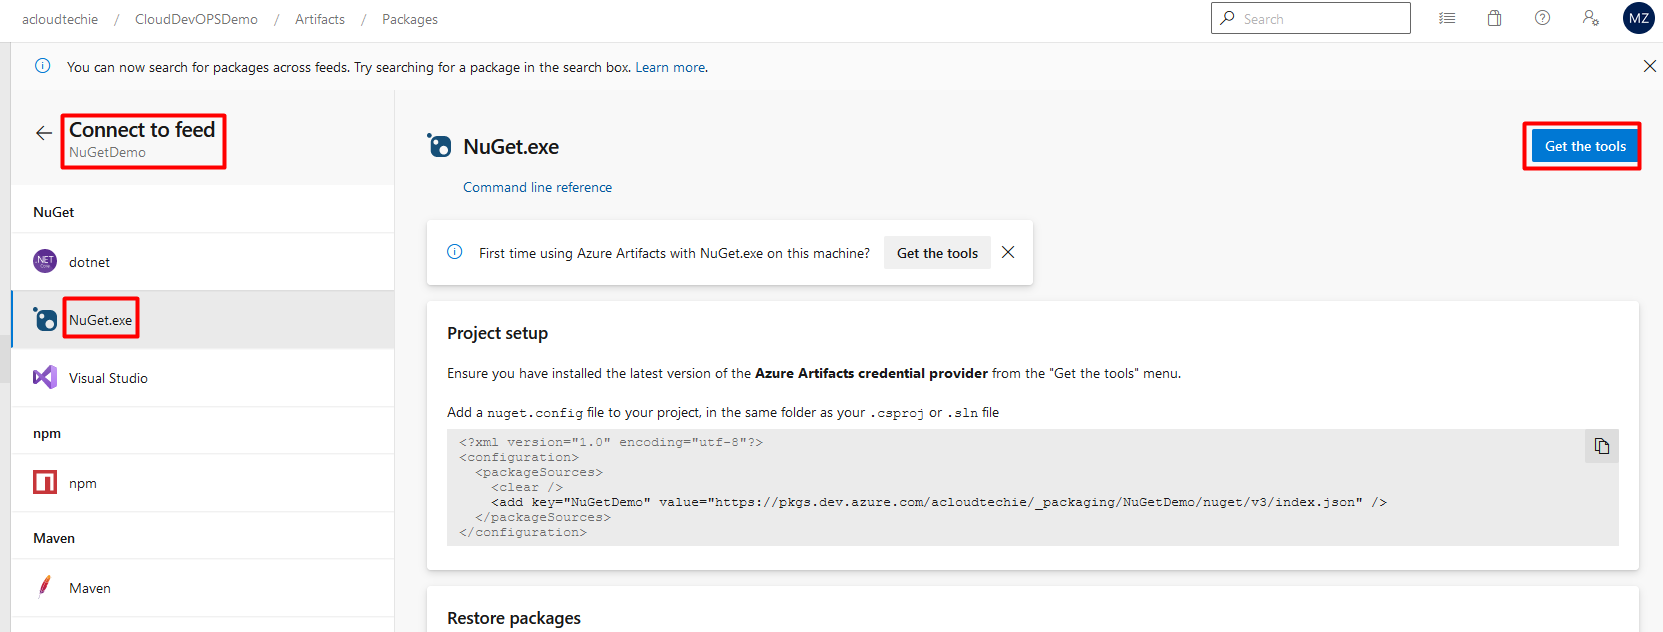
Head over to browser window for Azure DevOPS. On the feed created before, Click Connect to feed > NuGet.exe > Get the tools as shown in Figure 15.
Follow the instruction on “Get the tools” dialogue box:
- Step 1 Download the latest NuGet > Place it in any path of OS
- Step 2 Download and install the credential provider
Step 2 is only needed if you don’t have any version of Visual Studio installed. When you publish NuGet package using nuget.exe it asks for authentication with an account you logged into Azure DevOPS.
If you don’t have Visual Studio then put both nuget.exe and credential provider in same path so it can perform authentication.
We’ve downloaded nuget.exe to C:\Temp but haven’t add this into path. In this case, nuget cannot be executed from everywhere because it doesn’t know where to look for nuget. (See Figure 16)

Open PowerShell to the Package Path
Now, I’ll publish the package to feed directly from the path where it was created on. Let’s go to the path and open PowerShell from there by holding Shift key + Right Click. (Figure 17)
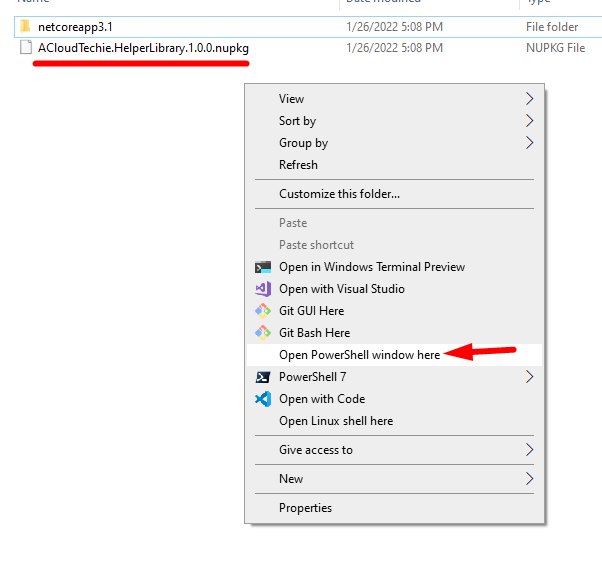
This is the prompt when I Click Open PowerShell window here.
PS C:\Users\MuhammadZeeshan\NuGetDemo\HelperLibrary\bin\Debug>
Verify registered sources
We can verify registered sources by executing following command:
PS C:\Users\MuhammadZeeshan\NuGetDemo\HelperLibrary\bin\Debug> C:\Temp\nuget.exe sources
Registered Sources:
1. nuget.org [Enabled]
https://api.nuget.org/v3/index.json
2. Microsoft Visual Studio Offline Packages [Enabled]
C:\Program Files (x86)\Microsoft SDKs\NuGetPackages\
3. NuGetDemo [Enabled]
https://pkgs.dev.azure.com/acloudtechie/_packaging/NuGetDemo/nuget/v3/index.json
PS C:\Users\MuhammadZeeshan\NuGetDemo\HelperLibrary\bin\Debug>
Our feed source is listed above on number 3 so now we’re all set to push NuGet package to feed in Azure Artifacts.
Push NuGet Package to Feed
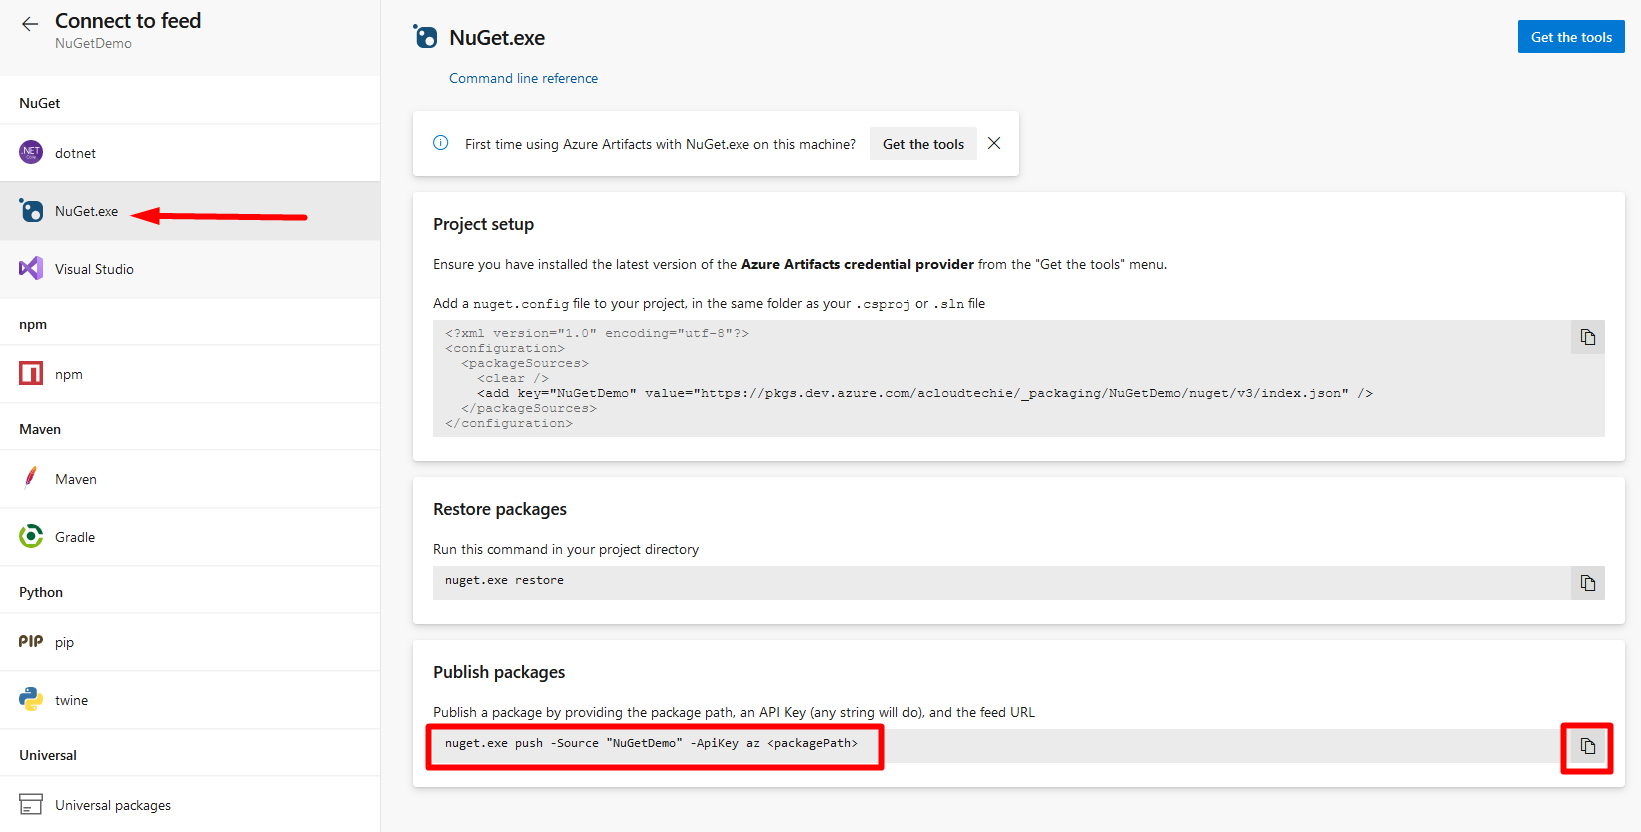
Return to browser window open to Azure DevOPS > Copy the command (shown in Figure 18) into any text editor > Change with the values according to your system:
nuget.exe push -Source "NuGetDemo" -ApiKey az <packagePath>
C:\Temp\nuget.exe push -Source "NuGetDemo" -ApiKey az ACloudTechie.HelperLibrary.1.0.0.nupkg
Return to PowerShell > Execute following command to publish your package. Log in Azure DevOPS when asked.
C:\Temp\nuget.exe push -Source "NuGetDemo" -ApiKey az ACloudTechie.HelperLibrary.1.0.0.nupkg
Above command should succeed after some time and return similar to the following:
Pushing ACloudTechie.HelperLibrary.1.0.0.nupkg to 'https://pkgs.dev.azure.com/acloudtechie/_packaging/ade5fca8-e5f9-4b79-9806-15388c12139a/nuget/v2/'...
PUT https://pkgs.dev.azure.com/acloudtechie/_packaging/ade5fca8-e5f9-4b79-9806-15388c12139a/nuget/v2/
Accepted https://pkgs.dev.azure.com/acloudtechie/_packaging/ade5fca8-e5f9-4b79-9806-15388c12139a/nuget/v2/ 8232ms
Your package was pushed.
Artifacts for Package Management
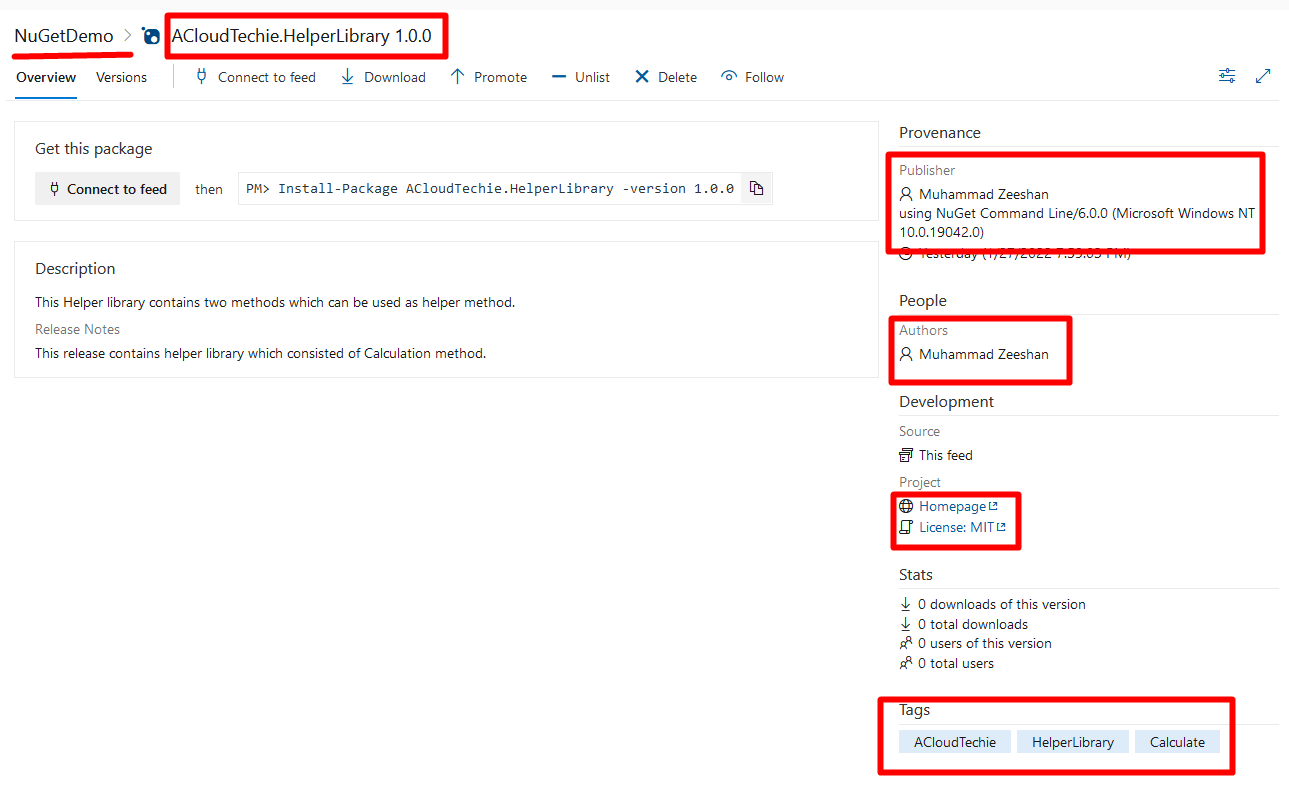
Return to browser window for Azure DevOPS and Refresh the page. You will see the NuGet package is published in the feed as shown in Figure 19.

If we click on the package, we can see all the information about it that includes Publisher, Authors, Homepage, Stats and Tags as shown in Figure 20.
Automate the versioning of a NuGet package
In previous section, we manually published our NuGet package to feed, but we want to avoid this manual effort and use an automated way to update the feed with latest version.
To achieve our goal, we need to take advantage of following services in Azure DevOPS.
- Azure Repos -> to source control our HelperLibrary.
- Build Pipelines -> to build, pack and publish NuGet package to feed.
Creating a Repo in Azure Repos
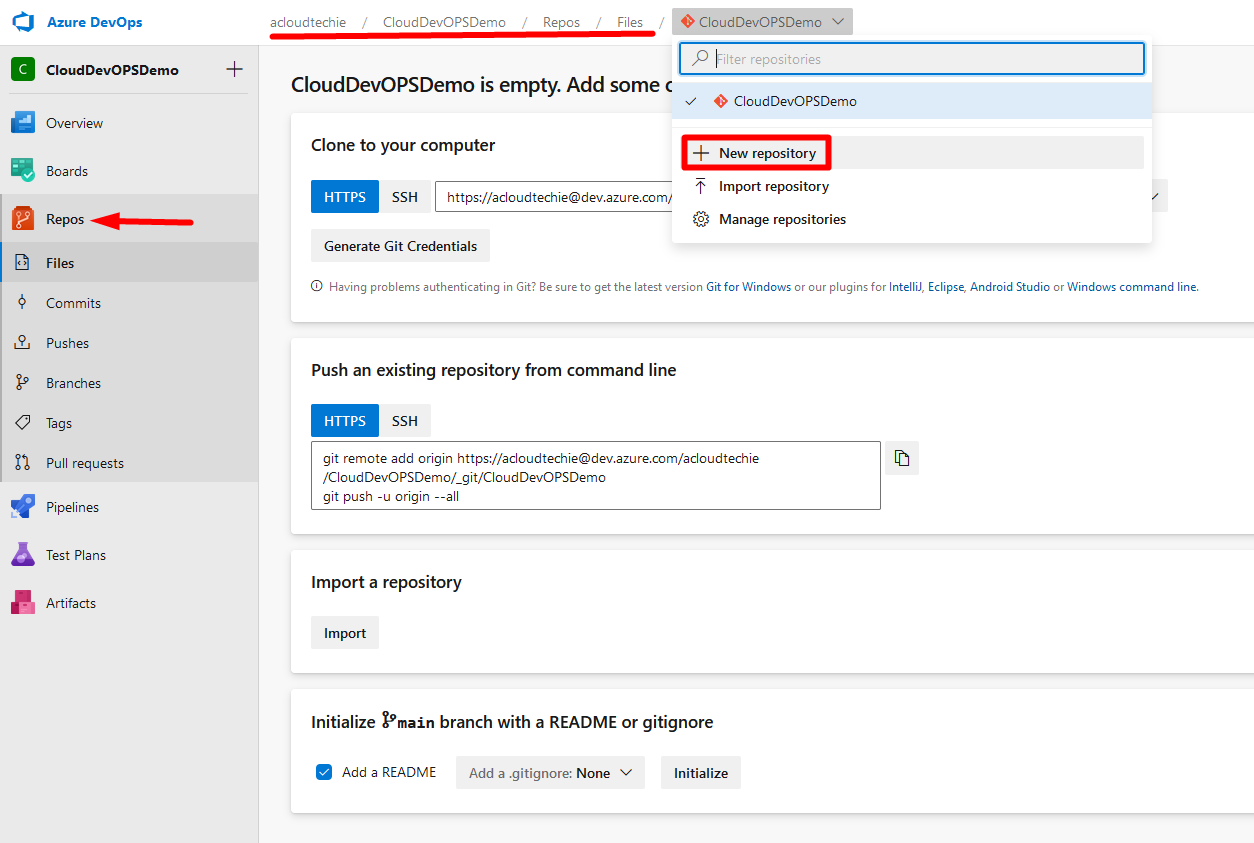
Return to browser window open to Azure DevOPS > Click on Repos > Select New repository from drop down of breadcrumb menu as shown in Figure 21.
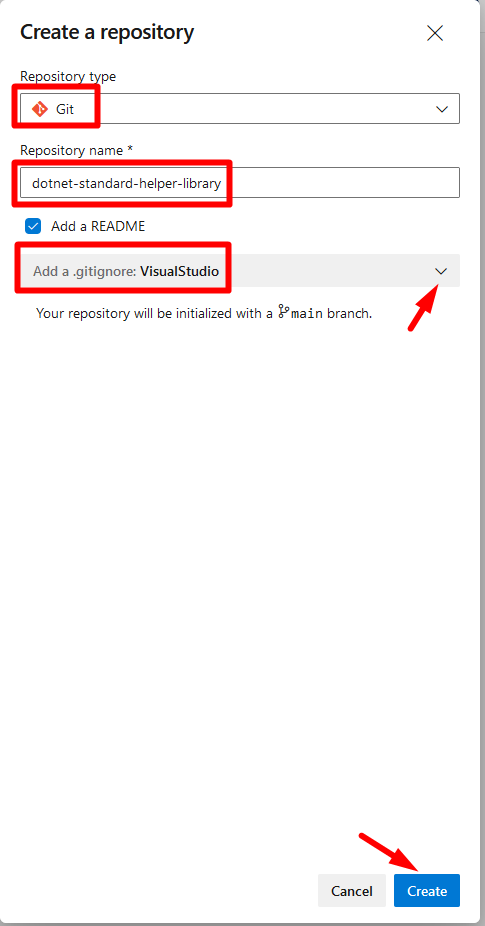
Select Repository type to Git > Set Name > Select VisualStudio from the list in drop down menu > Click Create as shown in Figure 22.
Clone and Push code to Repository
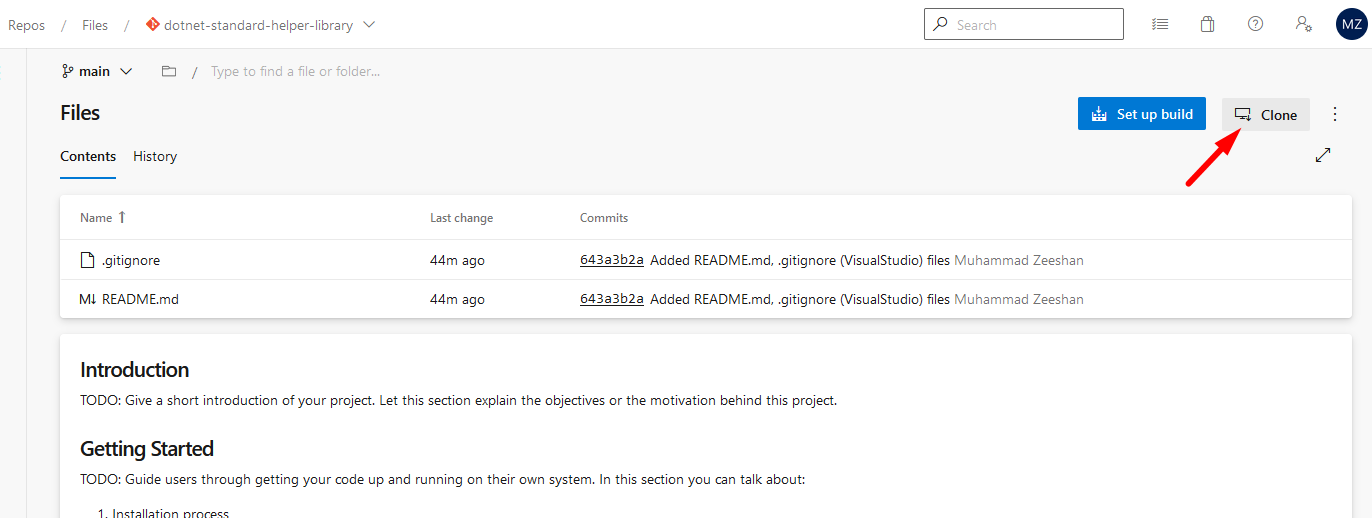
Now, our repo is ready to host HelperLibrary we created here.
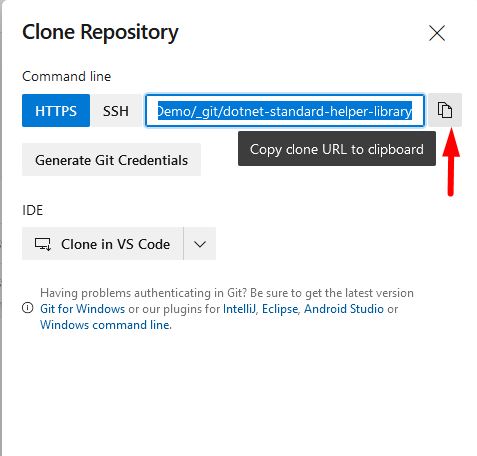
Click Clone button on Repository page > Click Copy URL button to copy the URL > Open folder where you want to clone the repo Open Git bash (for windows) or Terminal in VS Code > Execute following command > Provide credentials when asked
git clone https://acloudtechie@dev.azure.com/acloudtechie/<azure_devops_project_name>/_git/<repository_name>
Note: See Figure 23 and 24.
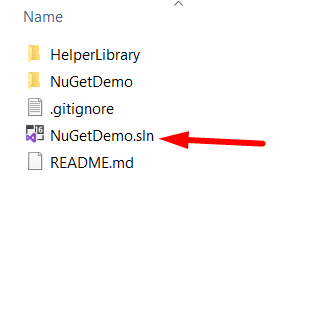
Our repo is cloned so now copy the code in this directory and open project by clicking on solution file as shown in Figure 25.
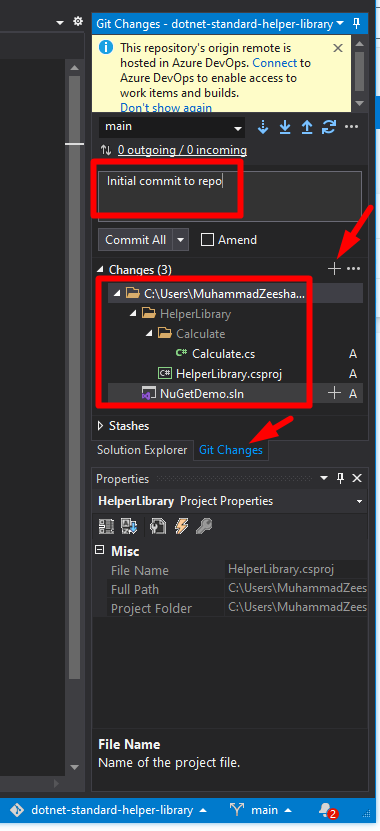
Click on Git Changes > Select everything from the files > Right Click and Select Stage or Click “+” icon to stage it all > Type Commit message > Click Commit All (See Figure 26)
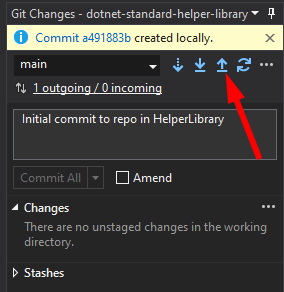
Click Up Arrow Icon to push code into repository as shown in Figure 27.
Return to browser window > Hit Refresh and see solution and project files in repository as shown in Figure 28.
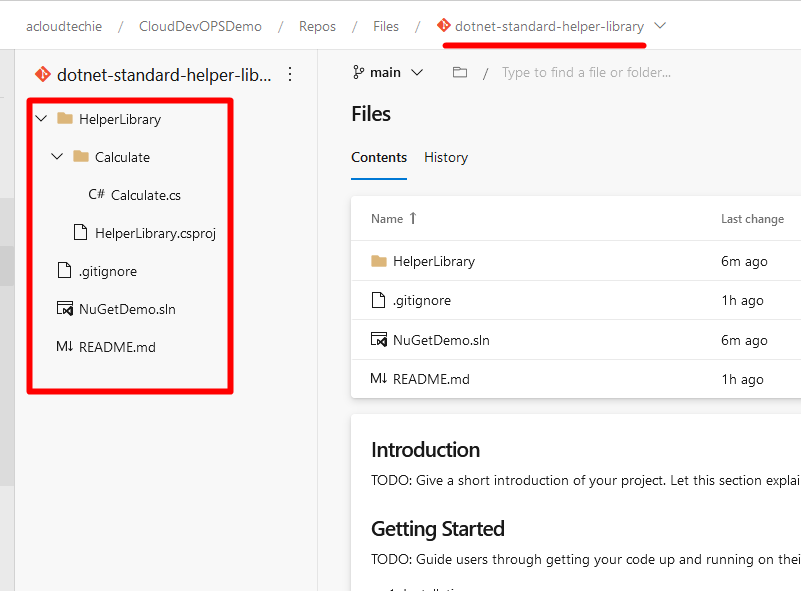
Make sure to add solution along with all project files because solution itself does not contain any code but just a reference which locates on your hard drive. You cannot just copy a solution file and expect it to work anywhere else.
We also need folders which contains .cs file where the code lives in.
Create Build Pipeline
Now, we will create a build pipeline to automate the versioning, packing and publishing of our HelperLibrary as NuGet package to feed.
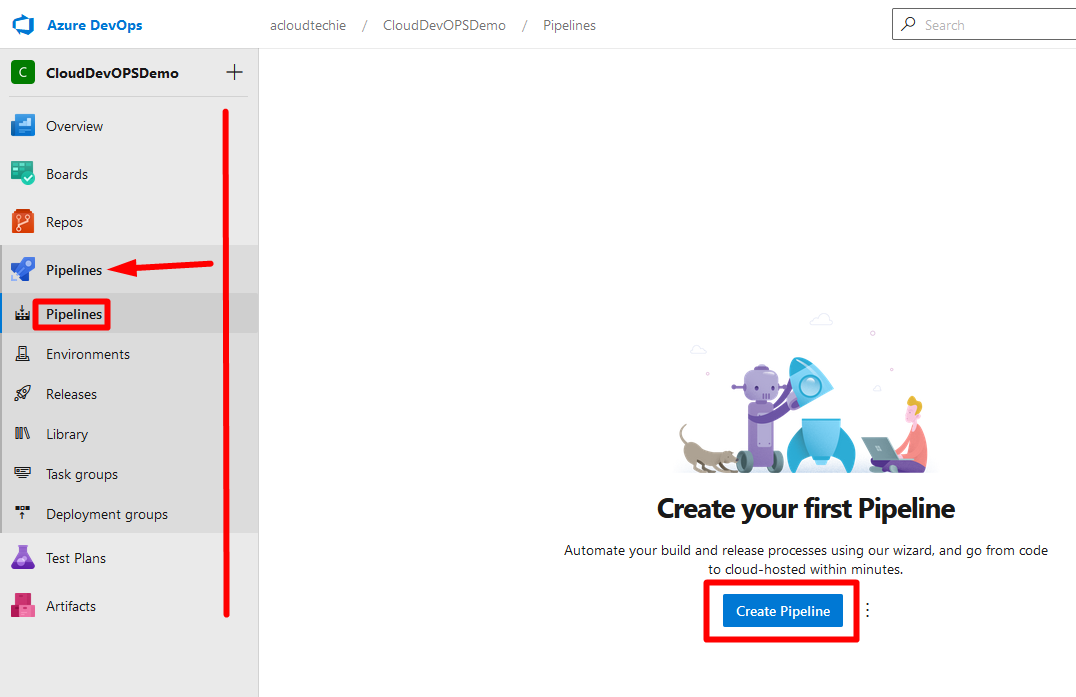
Click on Rocket Icon from left side menu > Select Pipelines > Click Create Pipeline button as shown in Figure 29.
To make this pipeline a simple enough, select Use the classic editor because YAML based pipeline can be tricky on this stage.
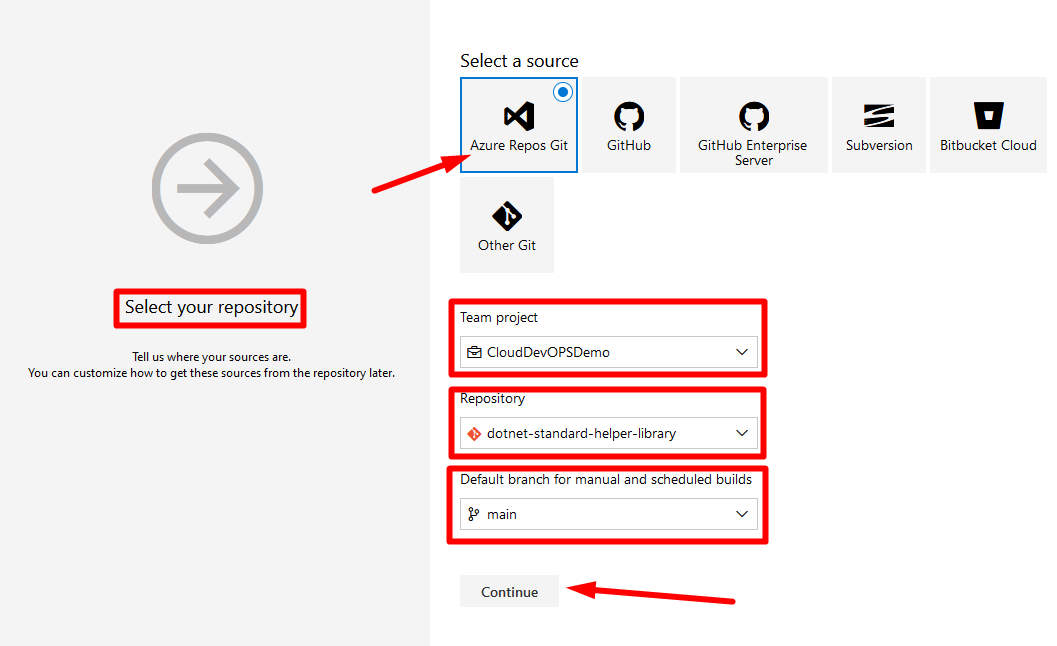
Next step is to select a source where our code is hosted in. It could be any other version control system. We will be using Azure Repos Git so select the details and click Continue as shown in Figure 30.
- Team project -> which lives in an organization
- Repository -> where we hosted our code
- Default branch -> default branch for manual and scheduled builds
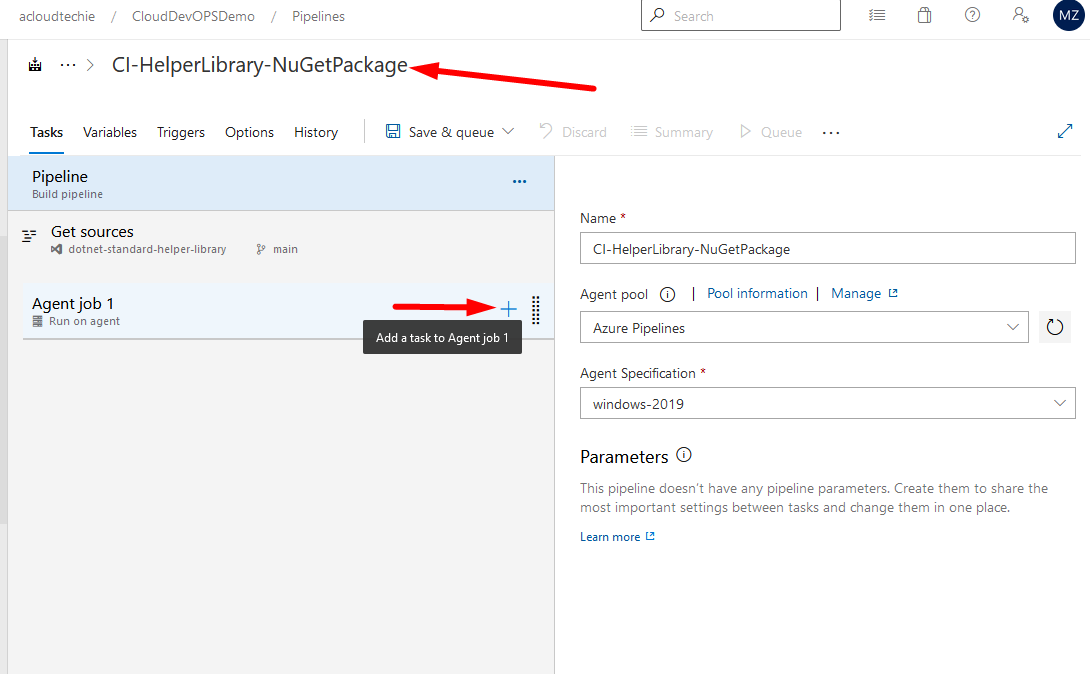
In the next step, Select Empty job because we will add all the tasks manually. By clicking on Empty job this will come up with a new build pipeline that does not contain any task at the moment.
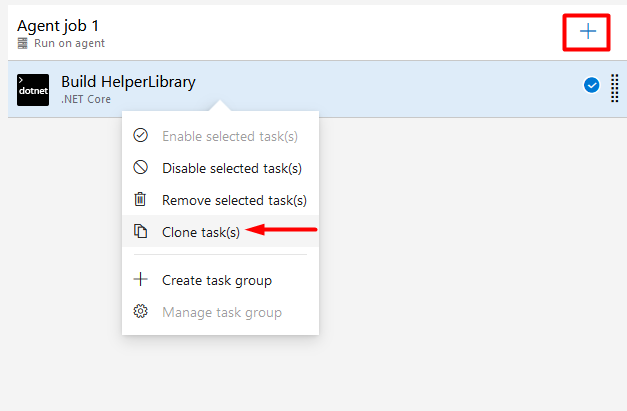
Give it a friendly name > Click on “+” icon to add a task as shown in Figure 31.
Build Pipeline Tasks
In this section, we built, packed and published NuGet package to feed using our local system. This time we are going to perform similar operations using Azure DevOPS to avoid/minimize manual efforts.
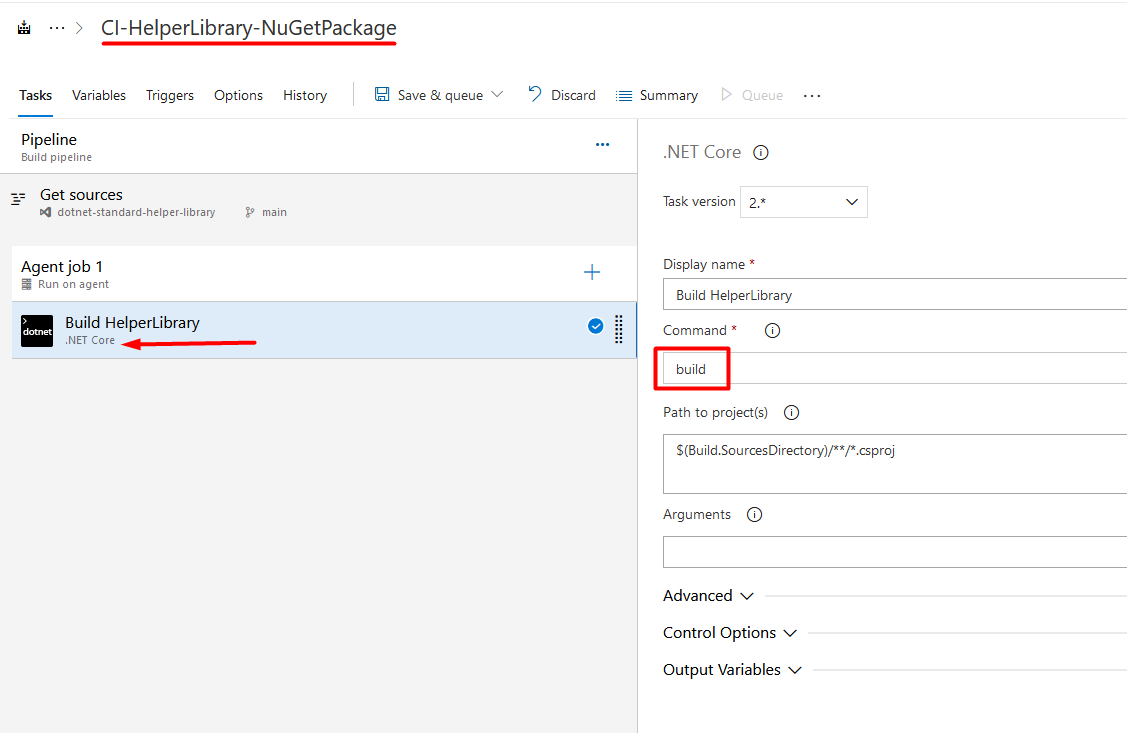
Azure Pipeline has a task named “.NET Core CLI” which is used for dotnet application while performing some operations such that build, test, package or publish. This task can also be used to run a custom dotnet command. Hence, we are going to use this to achieve our goal.
Click on “+” button > Add .NET Core task > Give it a friendly name > Select “build” from drop down menu of Command (See Figure 32)
We can add a new task or clone the same because different command will be used in this one. (Figure 33)
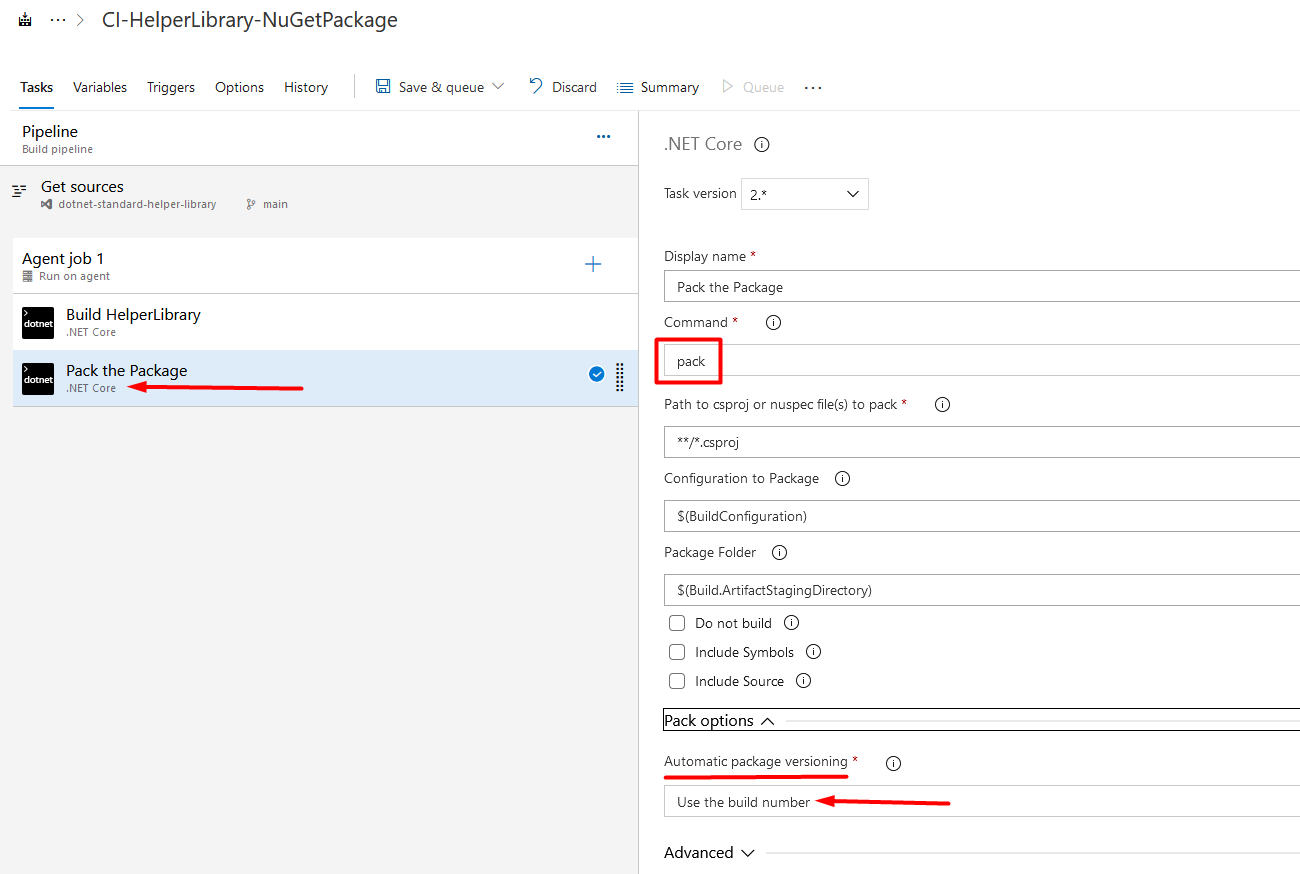
Once the task is added, give it a friendly name > Select “pack” from Command menu.
Leave remaining fields as it is > Select “Use the build number” from drop down menu of “Automatic package versioning” (Figure 34). This is required to name our NuGet package. We can select other options too such that with Date & Time or custom value within an environment variable.
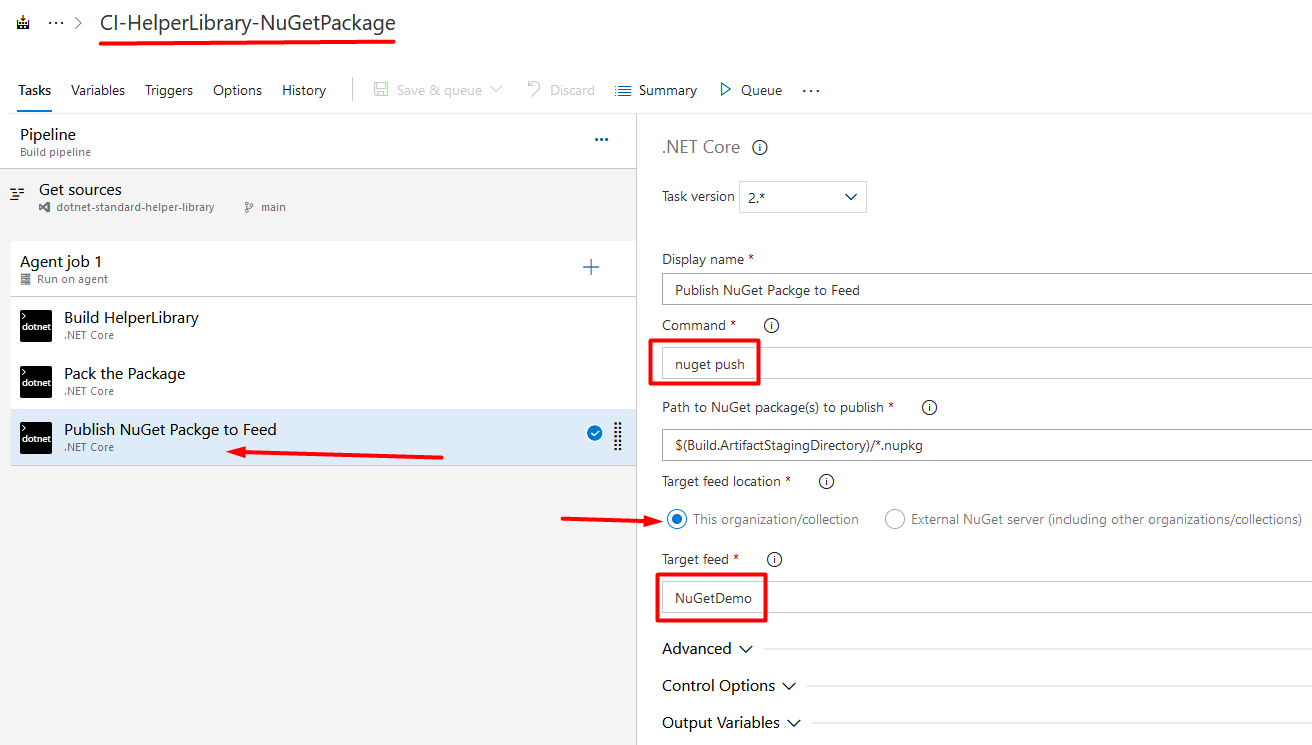
Let’s add another task to push NuGet package, give it a friendly name > Select “nuget push” from Command menu
Select “This organization/collection” as Target feed location > Select “NuGetDemo” as Target feed we created earlier. (See Figure 35)
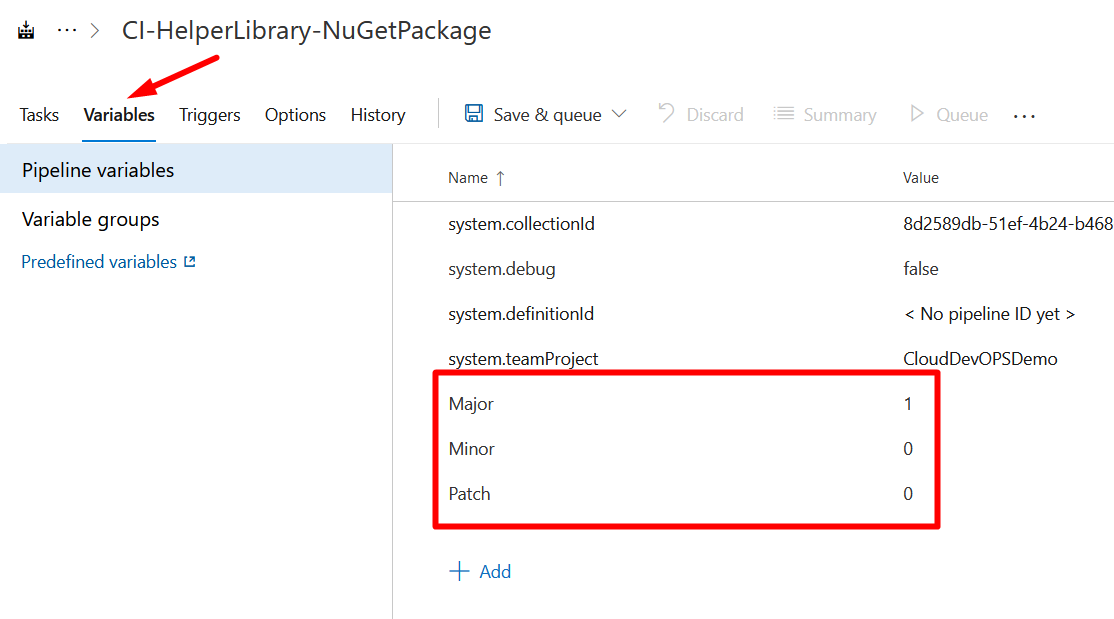
Pipeline Variables
Switch to Variables tab > Add following variables that are needed for “Build number format” and versioning of our NuGet package (Figure 36):
Major: 1
Minor: 0
Patch: 0
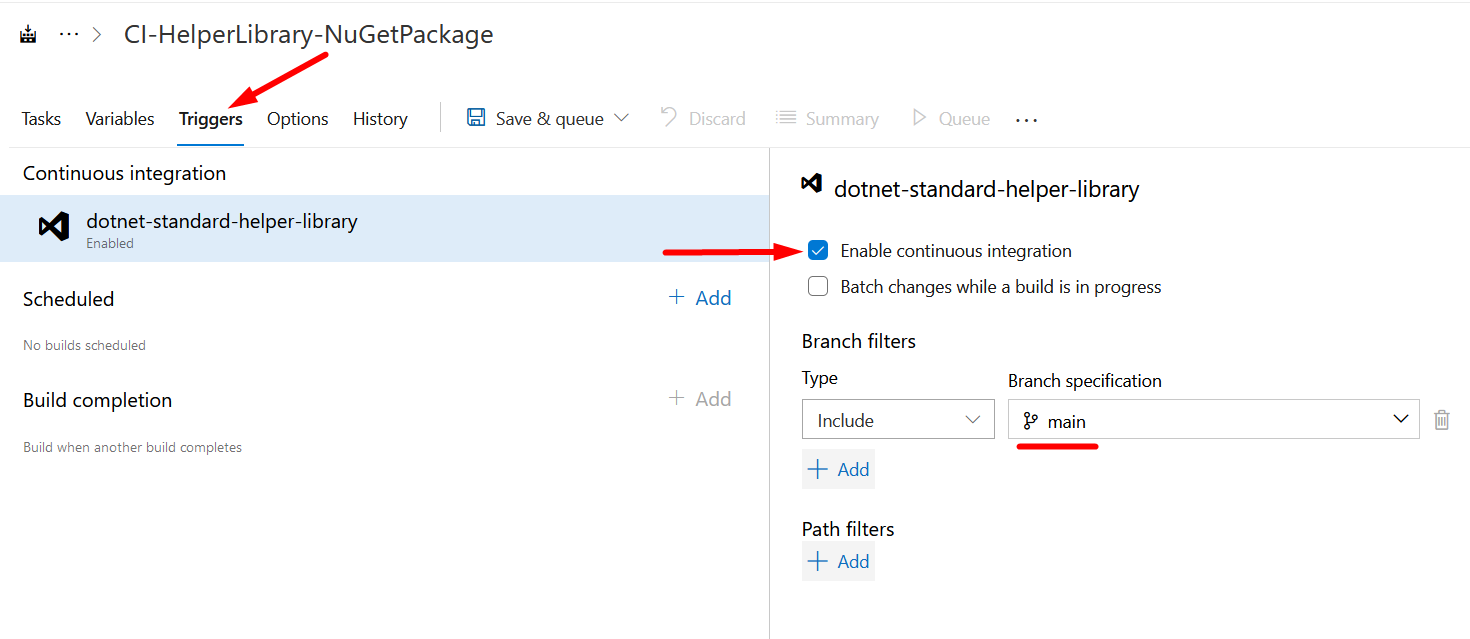
Switch to Triggers tab > Enable “continuous integration” check box > Select branch you want this pipeline to be triggered with. See Figure 37 for reference. This step is very important to automate the process of updating HelperLibray, package the code and publish to feed.
Package Versioning
We can identify NuGet packages by their names and version numbers. Since “Semantic Versioning” is a recommended approach to version the package therefore we will use the same scheme for our builds and packages.
We can tag our packages by using prelease labels and Semantic Versioning because it is supported in Azure Pipelines and can be configured in NuGet task.
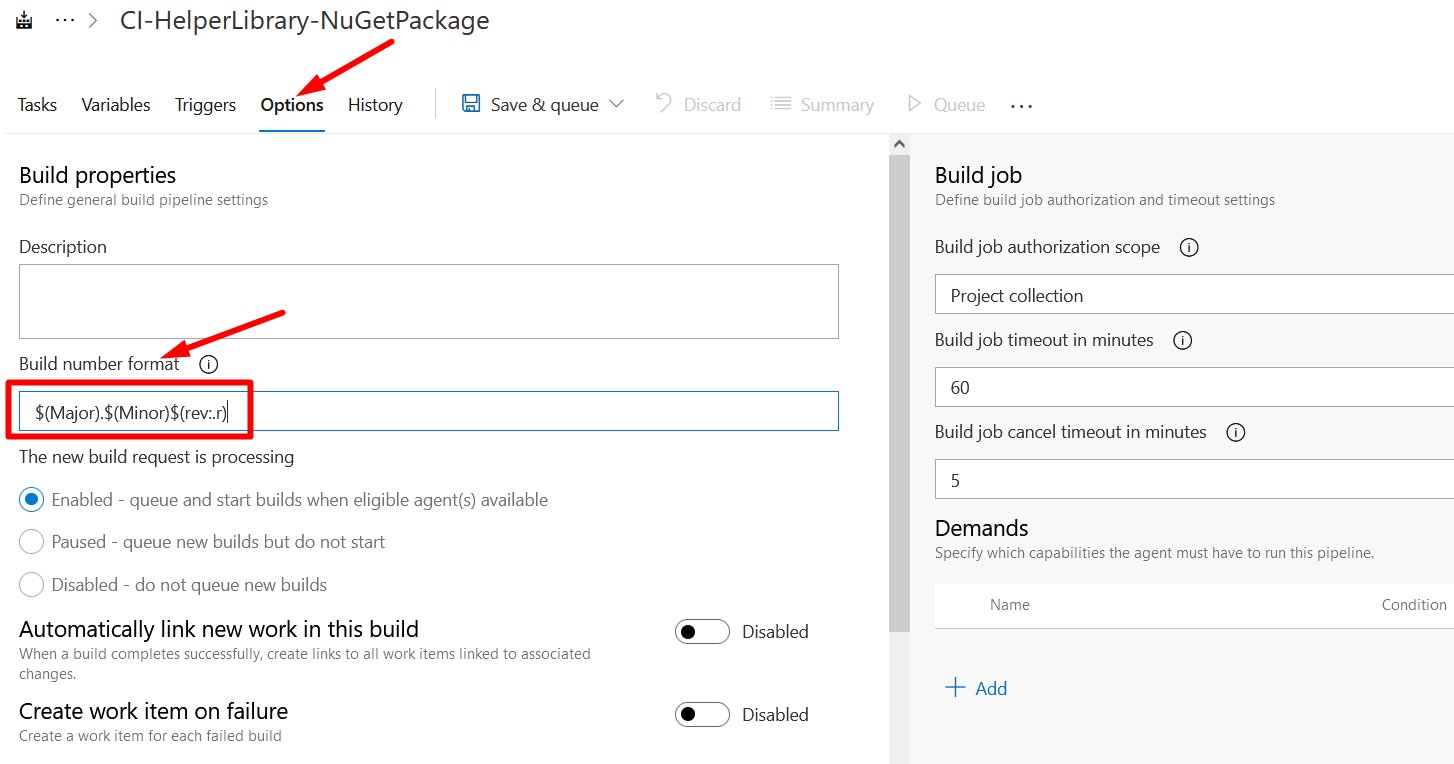
Switch to Options tab > Fill “Build number format” with the following value as shown in Figure 38:
$(Major).$(Minor)$(rev:.r)
… where Major and Minor are two variables defined under Variables section in our pipeline. In this way, build number and package version will automatically be incremented. But notice the Major and Minor versions which keeps constant until we change them manually in variables.
rev:.r ensures that every completed build has a unique name.
Example
$(Major) -> 1
$(Minor) -> 0
$(rev:.r)-> 0
1.0.1 > 2 > 3 and so on for each completed build
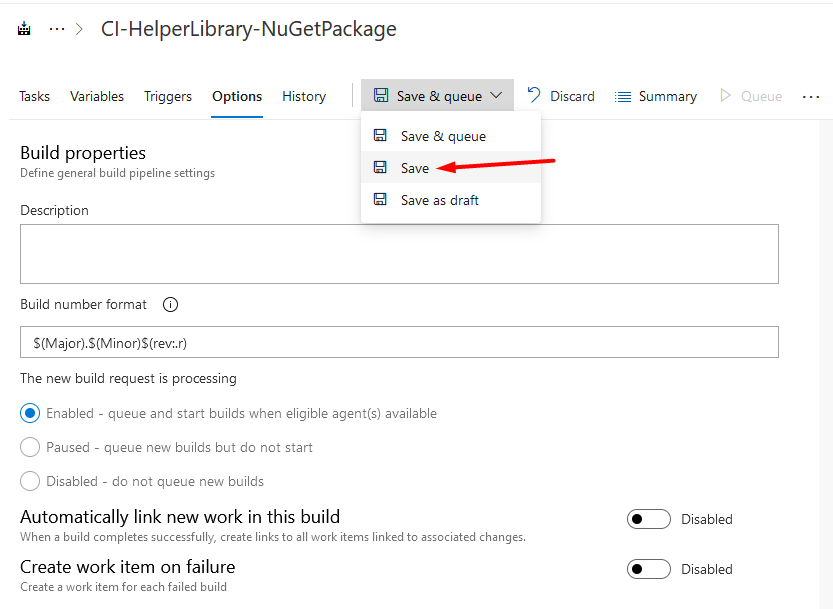
Now, we are done with setting up build pipeline. Select only Save from drop down menu of “Save & queue” and Click Save as shown in Figure 39. We are not going to queue the build at this time because automating the package versioning is our goal.
Importing NuGet Package
Our NuGet package in feed is now ready to import in any project as HelperLibrary. We will create a simple console app to take the advantage of NuGet feed.
Launch a new Visual Studio instance > Select “Create a new Project” > Search for Console Application based on .NET Core > Click Next > Fill in the required fields, for example Project name, Solution name etc > Click Next > Select Target Framework > Click Create
After performing above steps, new solution will be created that comes with simple “Hello World” statement to be printed on console. (See Figure 40)
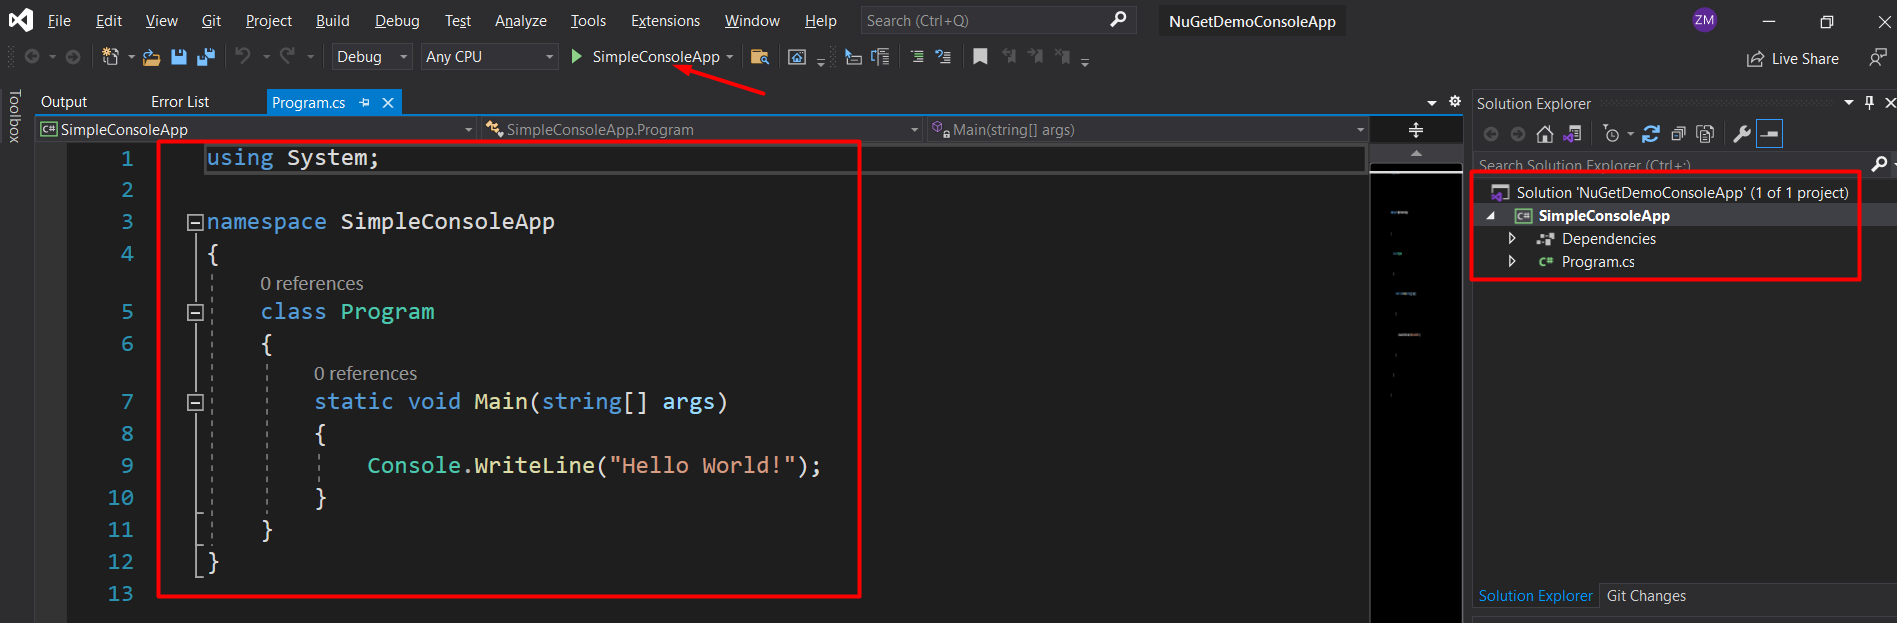
Run this application by clicking on Play button situated in Standard toolbar as shown in Figure 40. A new console window will be open that would print “Hello World” message. Notice that, it’s a very new project and has no connection between the two projects.
So now if I reference it by Right Click on Dependencies > Select Manage NuGet Packages.. > Select NuGetDemo from drop down of Package source > Select Browse then it will show the package that we published earlier in feed. Click Install to import it. See Figure 41.
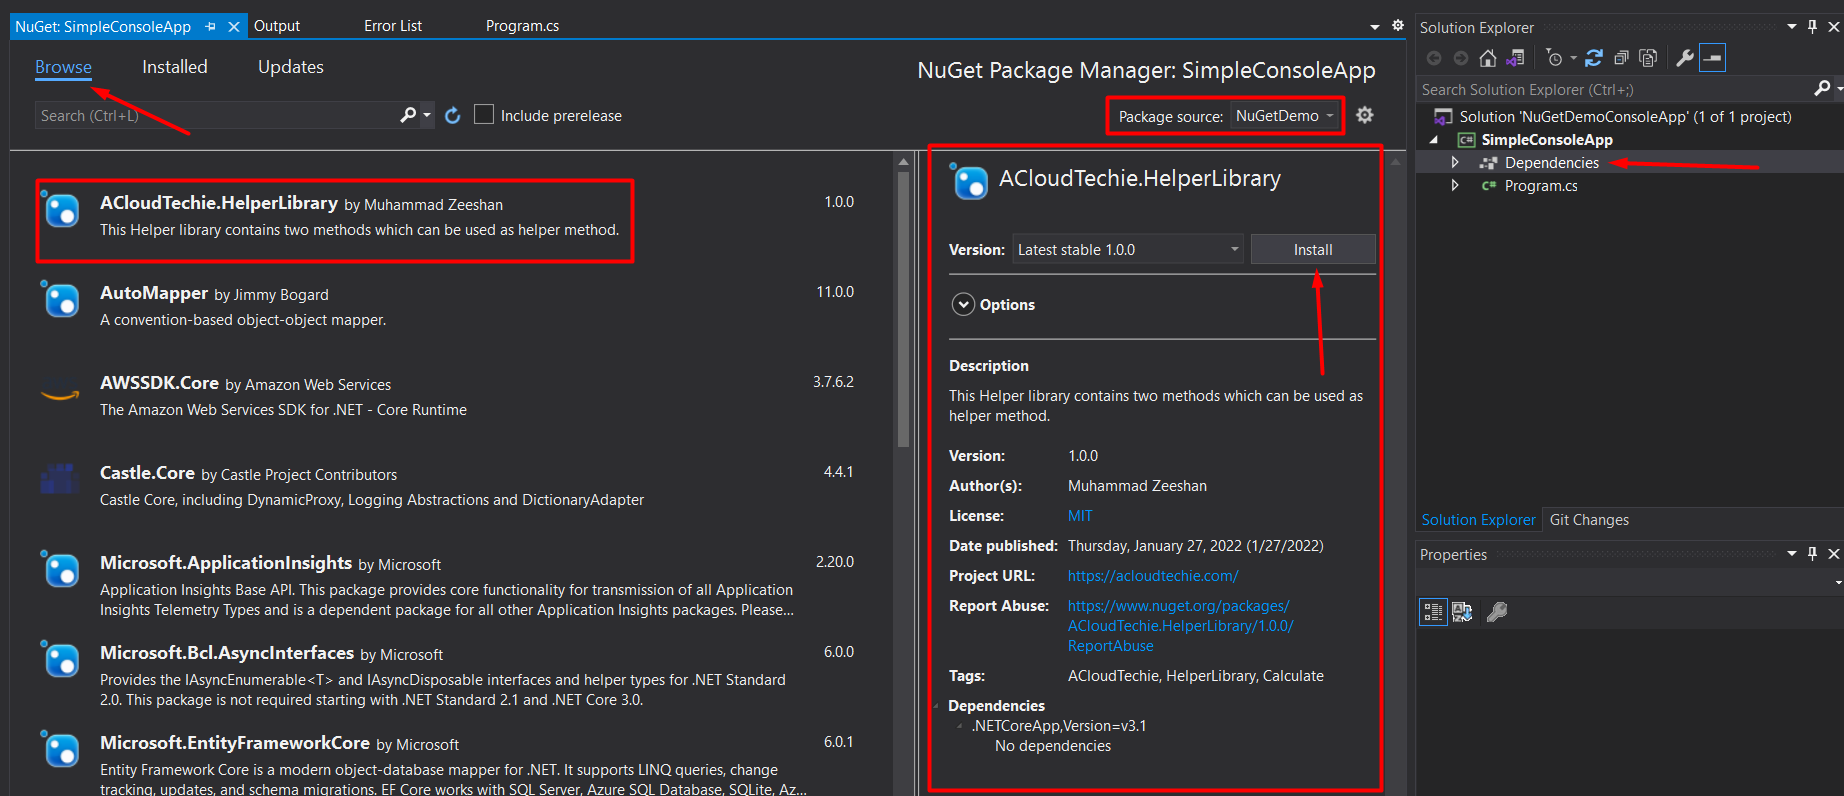
We can verify the installation by clicking on “Installed” tab. Now, let’s go to our project and start using HelperLibrary.
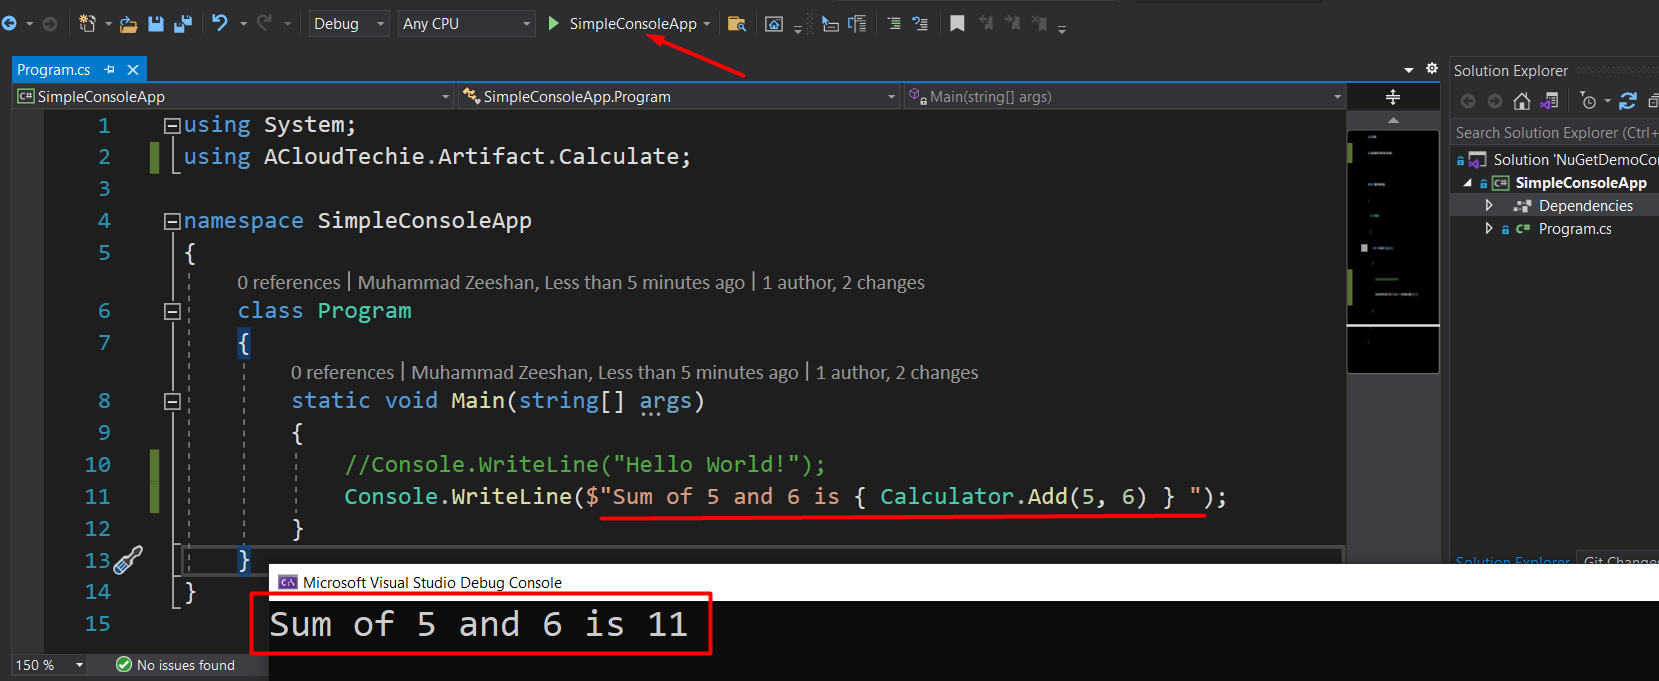
using statement with HelperLibrary namespace
First, we need to add using statement along with the default namespace (ACloudTechie.Artifact) that were used in HelperLibrary project. See screenshot here for reference. With that, our SimpleConsoleApp project can make calls to that helper library. Following is the statement in our case:
using ACloudTechie.Artifact.Calculate;
Reference Add method from NuGet Package
Now, we can call any method from NuGet Package to our SimpleConsoleApp project. Let’s try to use Add() method.
Calculator.Add(5, 6)
…where Calculator is a class which contains two methods Add and Subtract. We used Add() method in this demo.
Click here to see complete code.
Running Console Application
Run this application by clicking on Play button situated in Standard toolbar as shown in Figure 42. We’ve valid result based upon NuGet Package which means we’ve an application that’s using them.
Publish NuGet Package using Azure Pipelines
Assign Permission to Azure Pipelines
Azure pipeline could’ve been failed due to not having ReadWrite permissions to push NuGet package in feed. The error it will throw be similar to this as shown in Figure 43.
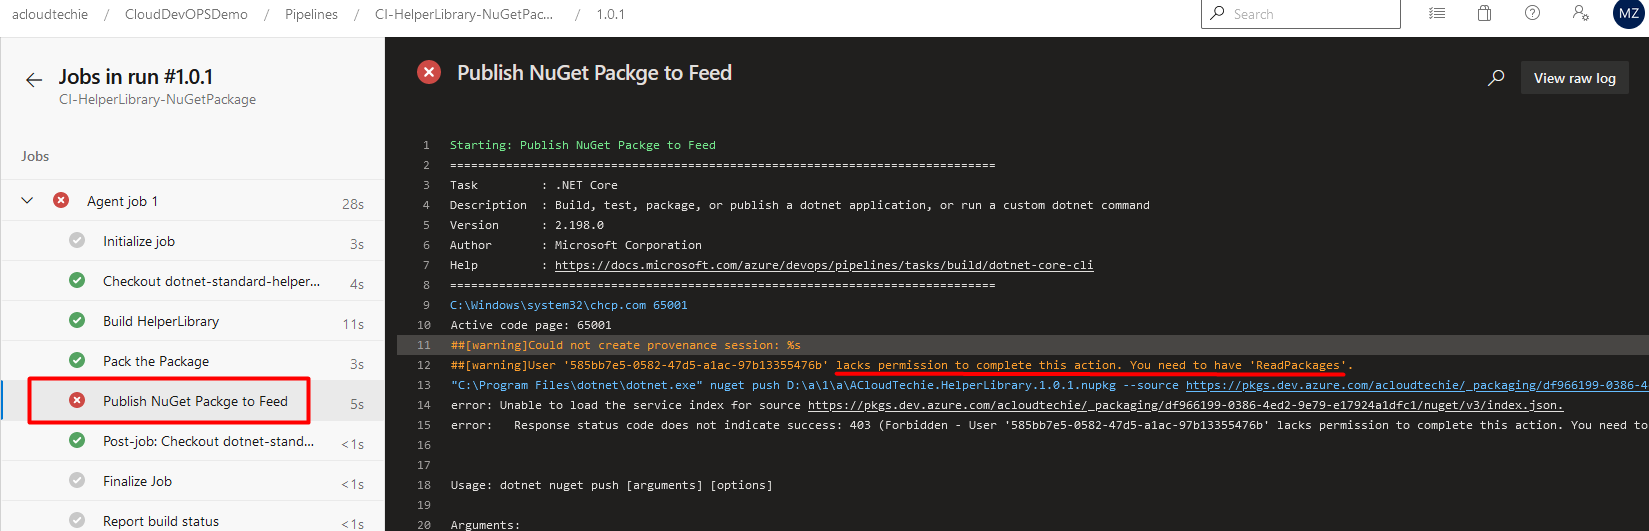
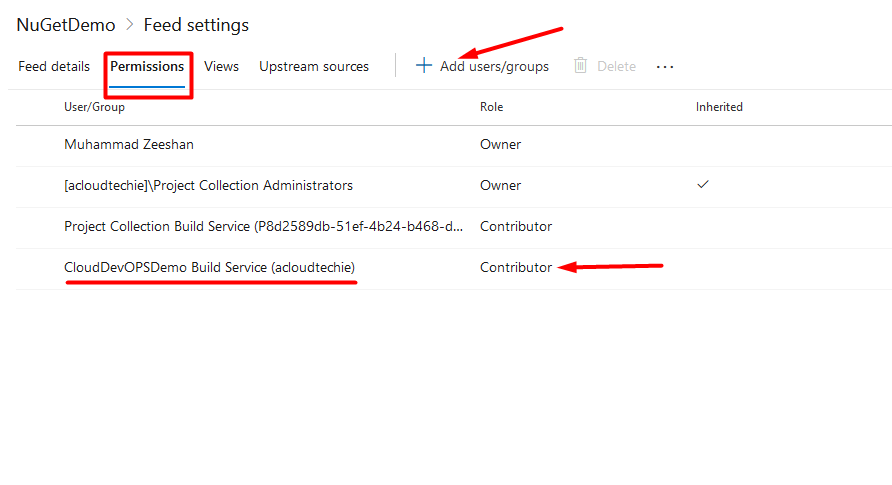
…therefore, add Build Service group of the project and assign it Contributor role so it can write to feed in Azure Artifacts.
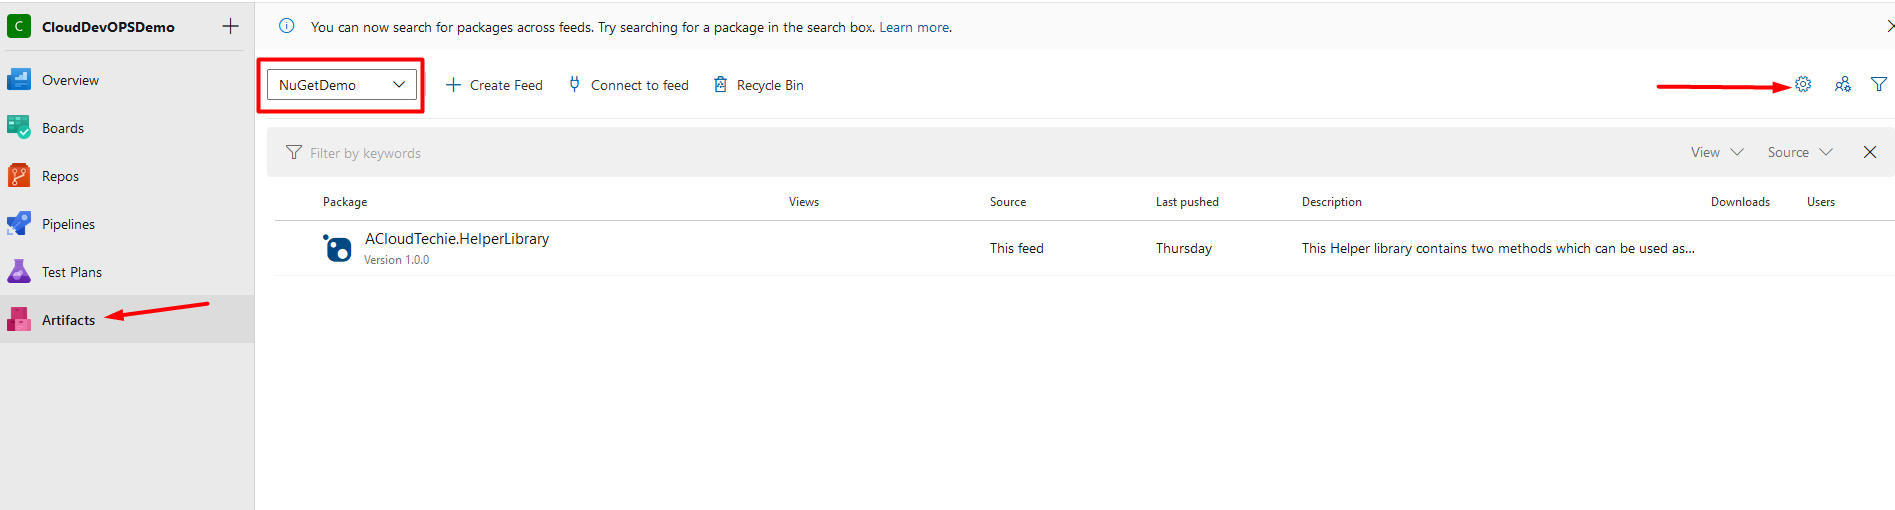
Return to browser window > Select Artifacts > Feed > Click on gear icon for Feed settings > Select Permissions > Click + button to Add users/groups as shown in Figure 44 and 45.
Update HelperLibrary Code
In this section, we will add another function and push to repo in our HelperLibray project. This will trigger build pipeline to release a new version of NuGet package in feed.
Let’s add new function called Multiply in this code and push changes to repo.
public static double Multiply(double numOne, double numTwo)
{
return numOne * numTwo;
}
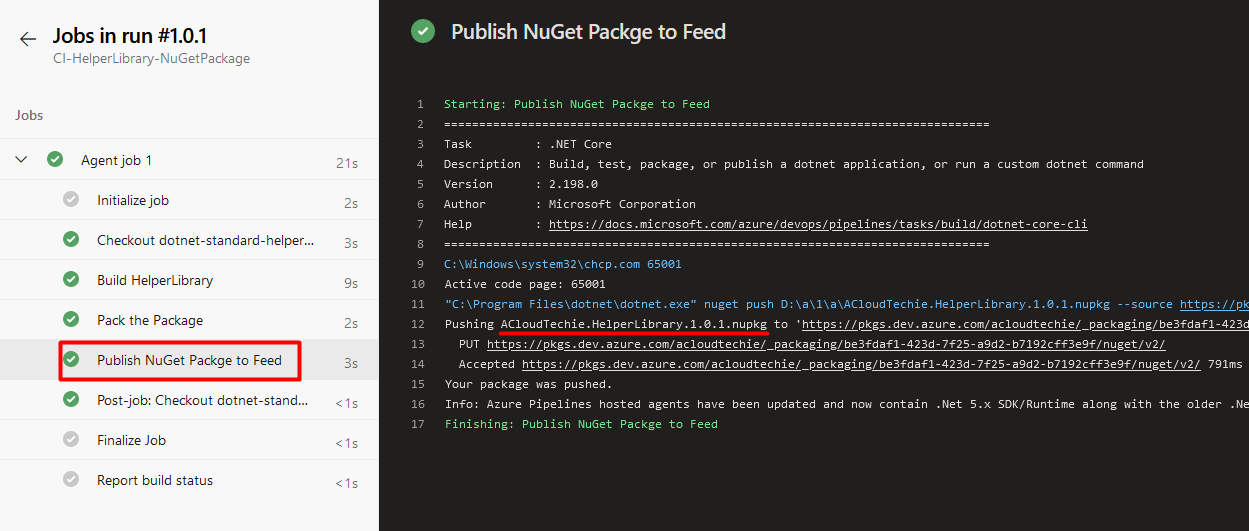
Return to browser window > Select Pipelines > Select automatically triggered pipeline > Select Agent job > Select the task created to push NuGet package. We can see the package version 1.0.1 has been created by following semantic versioning approach and pushed to feed as shown in Figure 46.
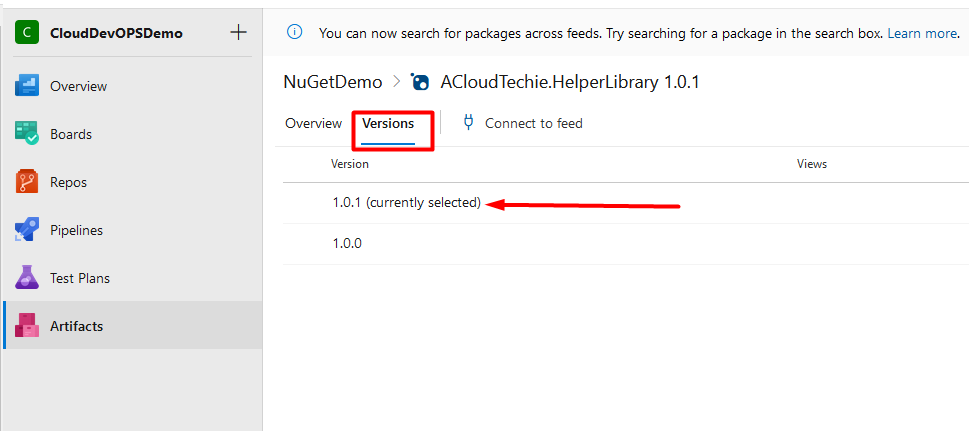
To verify that the new version has been published or not, go to feed and select package > Select Version > We can see new version in there which is currently selected as shown in Figure 47.
Let’s verify this in Visual Studio and see if we have new version available or not.
Open NuGetDemoConsoleApp project in Visual Studio > Right Click on Dependencies node > Select Manage NuGet Packages > Click on Updates which will be showing 1 update > Click on Package to show the details as shown in Figure 48.
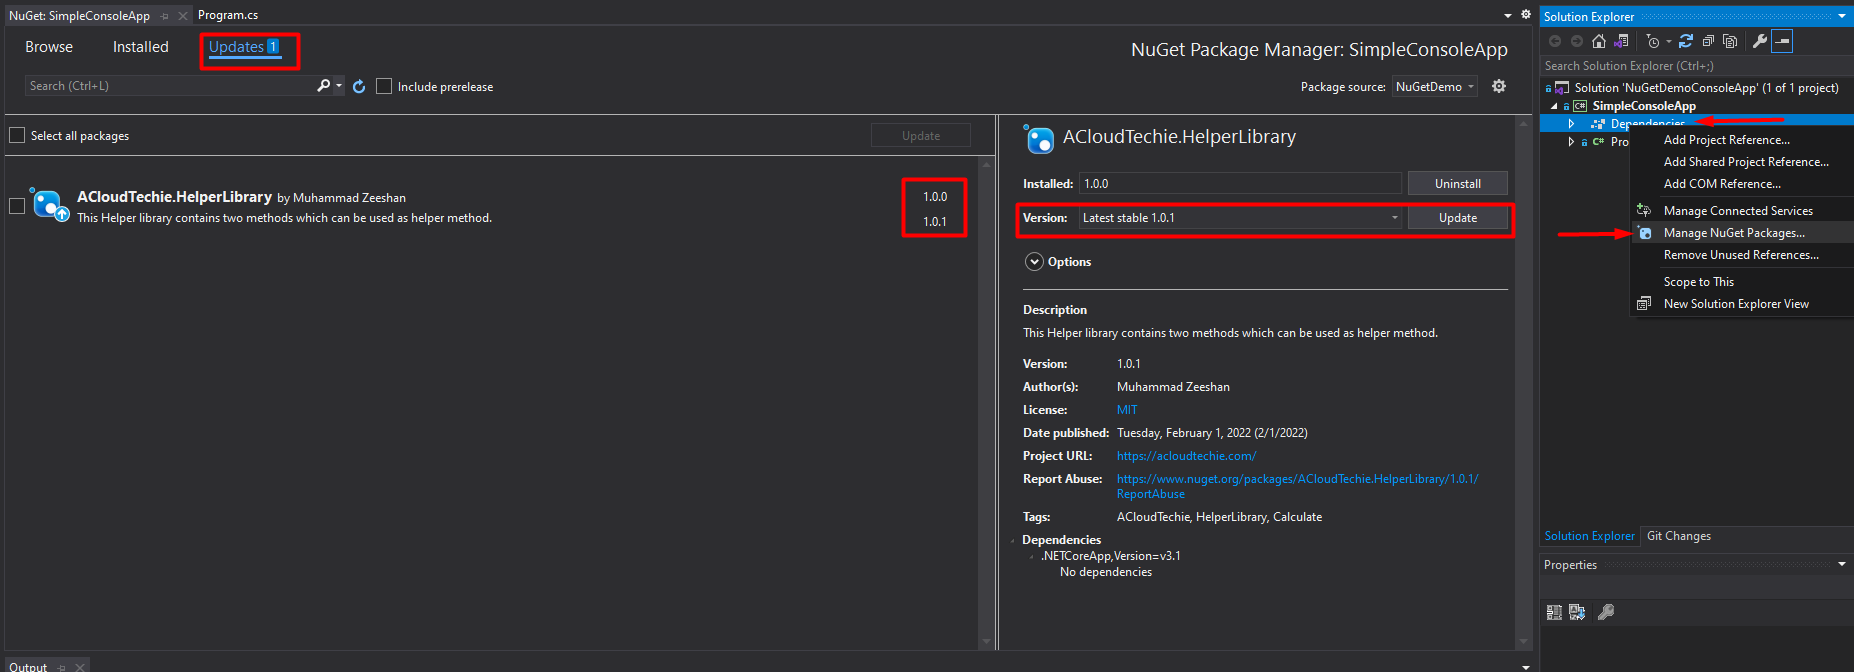
…once the package has been updated, it will start showing version 1.0.1 in Installed tab.
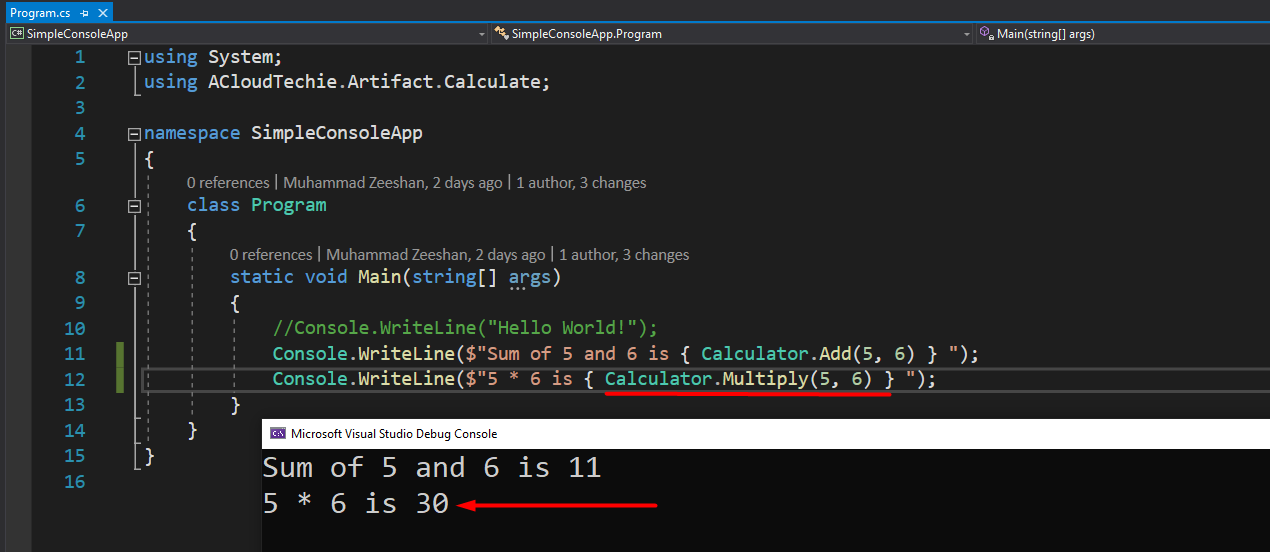
Now, we can use another method (Multiply) that is being referenced from HelperLibray (NuGet Package). See Figure 49.
…that’s the end of this article.
Conclusion!
In this article, we went through two approaches to create, build and publish our NuGet packages to feed in Azure Artifact. One approach was a manual process by using Visual Studio and second was using Azure Pipelines.
Thank you for reading!
how-to copy artifacts static files (js, css) in the project that use the “nuget package” (our artifacts) ? for Blazor app that use “library” with razor + js + css ?
Azure artifact is a package feed, it depends what kind of package we want to publish. My best guess here would be to download files from Azure files and publish them to Azure artifact. First, we just need to download the files in our pipeline and then publish to the azure artifacts.
Hi, looks very late response but might help someone who is looking at the way around.
To copy static files (JS, CSS) in a Blazor app that uses a NuGet package with Razor, JS, and CSS files, try to use the following steps:
1. In the library project (the one with the Razor, JS, and CSS files), add the static files to the project and set their “Build Action” property to “Content“. This will ensure that the files are included in the NuGet package.
2. In the library project, create a file called “nuspec” with the following content:
Click Here for code snippet.
This file specifies the files to include in the NuGet package and where to place them when the package is installed.
3. In the library project, create the NuGet package by running the following command in the command prompt:
nuget pack My.Package.Id.nuspecThis will create a NuGet package with the specified files included.
4. In the Blazor app project, add the NuGet package to the project using the NuGet Package Manager.
5. In the Blazor app project, add the following lines to the “csproj” file to copy the static files to the “wwwroot” folder when the project is built:
Lines to be added to csproj file
Replace “My.Package.Id” with the ID of your NuGet package.
These steps will ensure that the static files from the NuGet package are copied to the “wwwroot” folder of the Blazor app project when the project is built. This will allow the static files to be served by the app when it is run.