
Application security is important because they are often available over various networks and connected to the cloud, increasing vulnerabilities to security threats and breaches. In this blog post, we are going to discuss about geo-restricting web application using WAF and Application Gateway.
Before we get started into the topic, let’s first celebrate the community driven event Azure Spring Clean which is happening from 14th to 18th March – Monday to Friday. This is my first time writing for this great event #AzureSpringClean, an initiative from Joe Carlyle and Thomas Thornton. I’m excited to be part of this event helping and sharing knowledge around securing your application using Azure WAF and Application Gateway.

Geo-restricting web application using WAF
What is geo-blocking aka geo-restriction?
When we use term “Web Application” it refers to an app or service that users access through a browser interface over the internet. We make sure that our application is secure from all kinds of attack and common exploits. If our application is a regional based, then we also need to restrict its access based on the location. You may’ve already seen this when you tried to access Hulu, Netflix or another website only to get a message saying, “This content is not available in your country”. This is geo-blocking and sometimes known as geo-restriction.
This blog post contains:
- What is geo-blocking aka geo-restriction?
- What we want to achieve?
- How does geo-blocking work?
- What is Azure WAF?
- Azure WAF on Application Gateway
- How an Application Gateway works
- Create and configure an application gateway
- Test Application Gateway
- Create WAF policy and associate Application gateway
- Test the functionality
Prerequisite
In this blog post, our main focus will be around Azure WAF and Application gateway but for the sake of understanding, these are the prerequisites that are covered briefly. Head over to this URL or browse separately by clicking on the topic:
- Bicep templates to provision resources on Azure
- Azure Pipelines for CICD
- Azure Function written in golang
- Application Gateway with WAF enabled on it
What we want to achieve
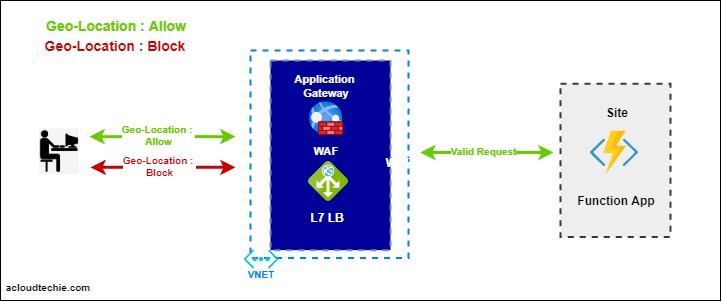
Our goal is to restrict the access to web application based on the location or by country/region. This diagram (Figure 1) shows the flow that we want to achieve.
- Someone wants to perform operation on our web application. This request either could be legitimate or any common attack.
- User could be based on any location in the world.
- We have a WAF policy associated with Application Gateway.
- This WAF policy has a custom geo-filtering rule that evaluates the requestor location.
- If there is a match for this request, the WAF will allow/deny it based on the condition.
How does geo-blocking work?
Geo-blocking works by using “tracking and geolocation technology” to identify your Internet Protocol (IP) address. Your IP address works like your home address — it indicates your general location. If your IP address is connected to a region or country where a particular site’s content should be blocked, geo-blocking is activated, and you can’t access that site.
What is Azure WAF?
Azure WAF (Web Application Firewall) is the service in Azure that provides centralized protection to your web application. It comes with the features that can secure your web application from common exploits and vulnerabilities. The WAF uses OWASP rules to protect your application. These rules include protection against attacks such as SQL injection, cross-site scripting attacks, and session hijacks. Most commons are SQL injection and XSS (cross-site scripting).. to name a few. You can also restrict to your web application by country/region.
Azure WAF on Application Gateway
Application Gateway operates as an application delivery controller (ADC). It is a powerful Microsoft Azure PaaS service that offers HTTP load balancing, reverse proxy, TLS, SSL termination, cookie-based session affinity, ability to host multiple websites and security capabilities.
Application Gateway security enhancements include TLS policy management and end-to-end TLS support. Application security is strengthened by WAF integration into Application Gateway. The combination protects your web applications against common vulnerabilities. And it provides an easy-to-configure central location to manage.
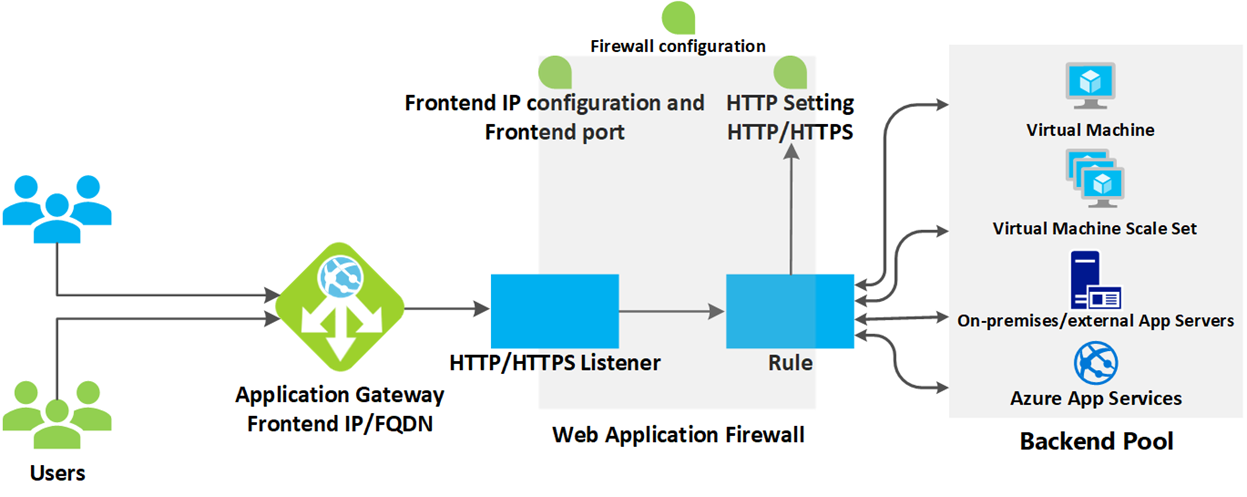
How an application gateway works
Irrespective of whether the request is coming from Azure Firewall, WAF or directly from Public Internet, the flow of the request to Application Gateway is well defined in Figure 2.
Create and configure Application Gateway
Following are the key components that are required for Application gateway to work but for detailed and step-by-step guide, head over to “Create and Configure Application Gateway”.
- Frontend IP
- Set type as “Public”
- Backend pool
- Select “App Service” because in this blog post, we are using function application as backend server.
- Listener
- Frontend IP -> Public
- Protocol -> Http
- Port -> 80
- Listener type -> Multi site
- Host type -> Single
- Host name -> azurespring-demo.acloudtechie.com
- HTTP Setting
- Backend protocol -> HTTP
- Backend Port -> 80
- Leave remaining value as it is
- Set override with new host name -> Yes
- Select -> Pick host name from backend target
- Make sure to select “Pick host name from backend target” otherwise routing rule will not pick the URL and throw 404 while calling API using URL that is configured in listener.
- Routing rule
- Target type -> Backend pool
- Path -> /api/*
- Since our function app has three functions so adding Path based rules will help us to call APIs using URL we configured earlier in listener under Host name field.
- We select /api/* because this is the starting path in our golang function app. For example
- http://aspw-golangfunc-aen-nonprod.azurewebsites.net/api/*
- Target name -> apiRule
- HTTP settings -> the same we created earlier
- Backend target -> backend pool that is used to route the request
Now, Application gateway is ready to serve the request.
Test Application Gateway
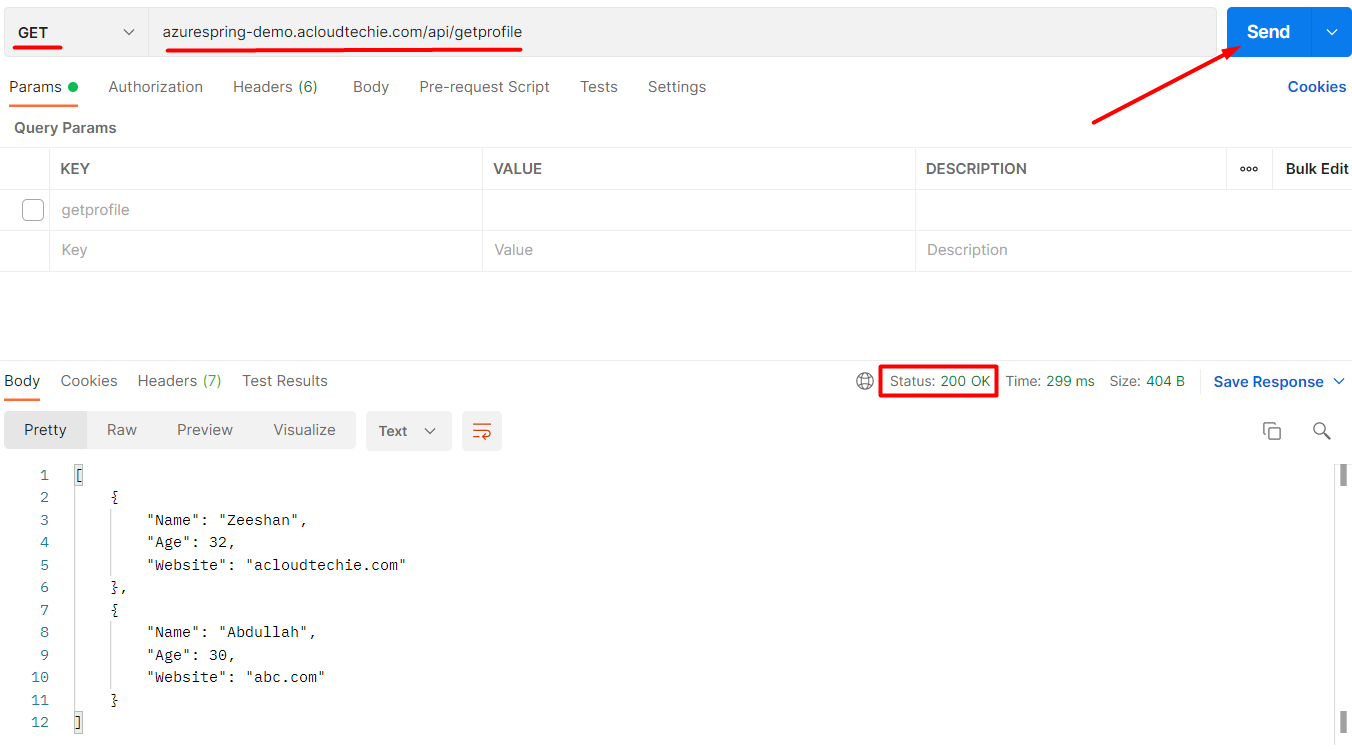
In this section, we will call an API to make sure that everything is correctly configured. Since our handler functions only supports get method so we can use both browser and postman to call APIs. Let’s use postman and see the result.
azurespring-demo.acloudtechie.com is the hostname we configured earlier in listener. To make the complete url, we will append URL path with the hostname after which it will look like this:
azurespring-demo.acloudtechie.com/api/getprofile
Let’s call this URL which will return 200 http status code as shown in Figure 3.
Create WAF policy and associate Application gateway
We’ve already seen the capabilities of WAF in this section hence our goal in this session is to create a WAF policy and associate Application gateway with it.
Head over to browser window open for Azure Portal and search for WAF, Select Web Application Firewall policies (WAF) and Click Create.
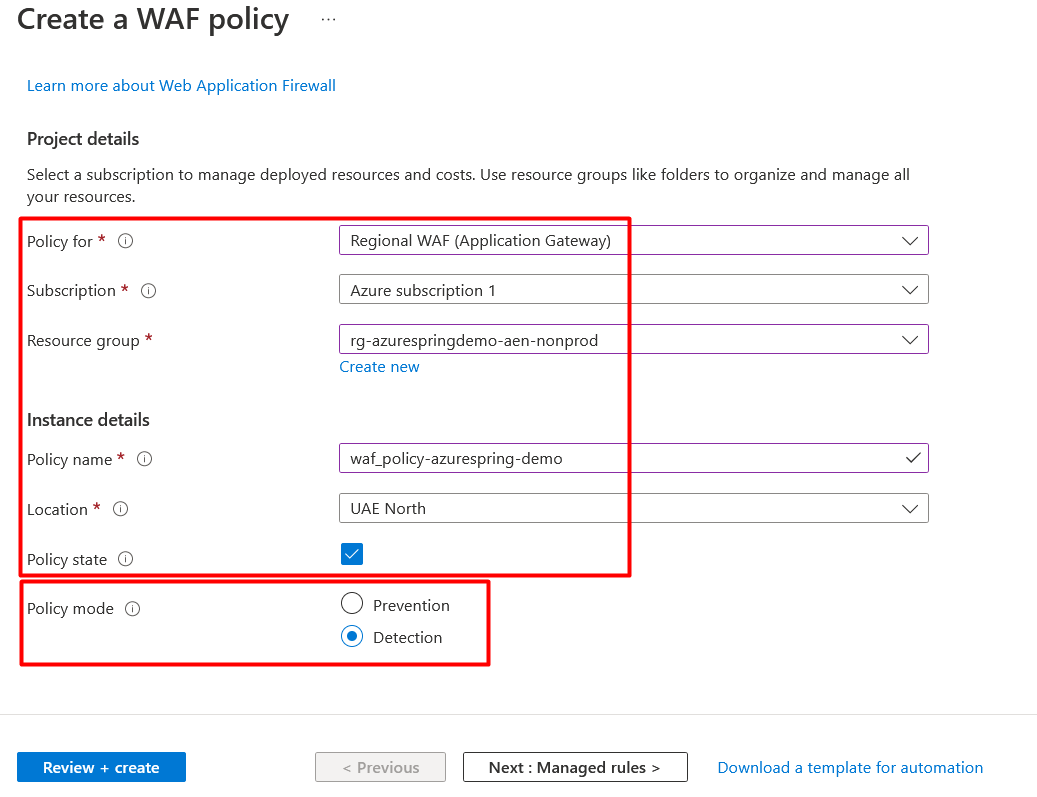
On Create a WAF policy page, Basics tab, enter or select the following information, accept the defaults for the remaining settings, and then select Review + create as shown in Figure 4:
- Policy for: Regional WAF (Application Gateway)
- Subscription: Select subscription
- Resource Group: Select resource group
- Policy name: Type unique name for WAF policy
- Location: Select location
- Policy state: Enabled
- Policy mode: Detection
As you can see, we have two modes:
- Detection
- In this mode, all requests will only be logged into either Storage account or Log analytics workspace if we’ve enabled diagnostics
- Prevention
- In this mode, all requests will be evaluated first and then apply action based on the custom rule.
Once you create a policy, it must be associated to an Application Gateway to go into effect, but it can be associated with any combination of Application Gateways and listeners.
Create geo-filtering custom rule
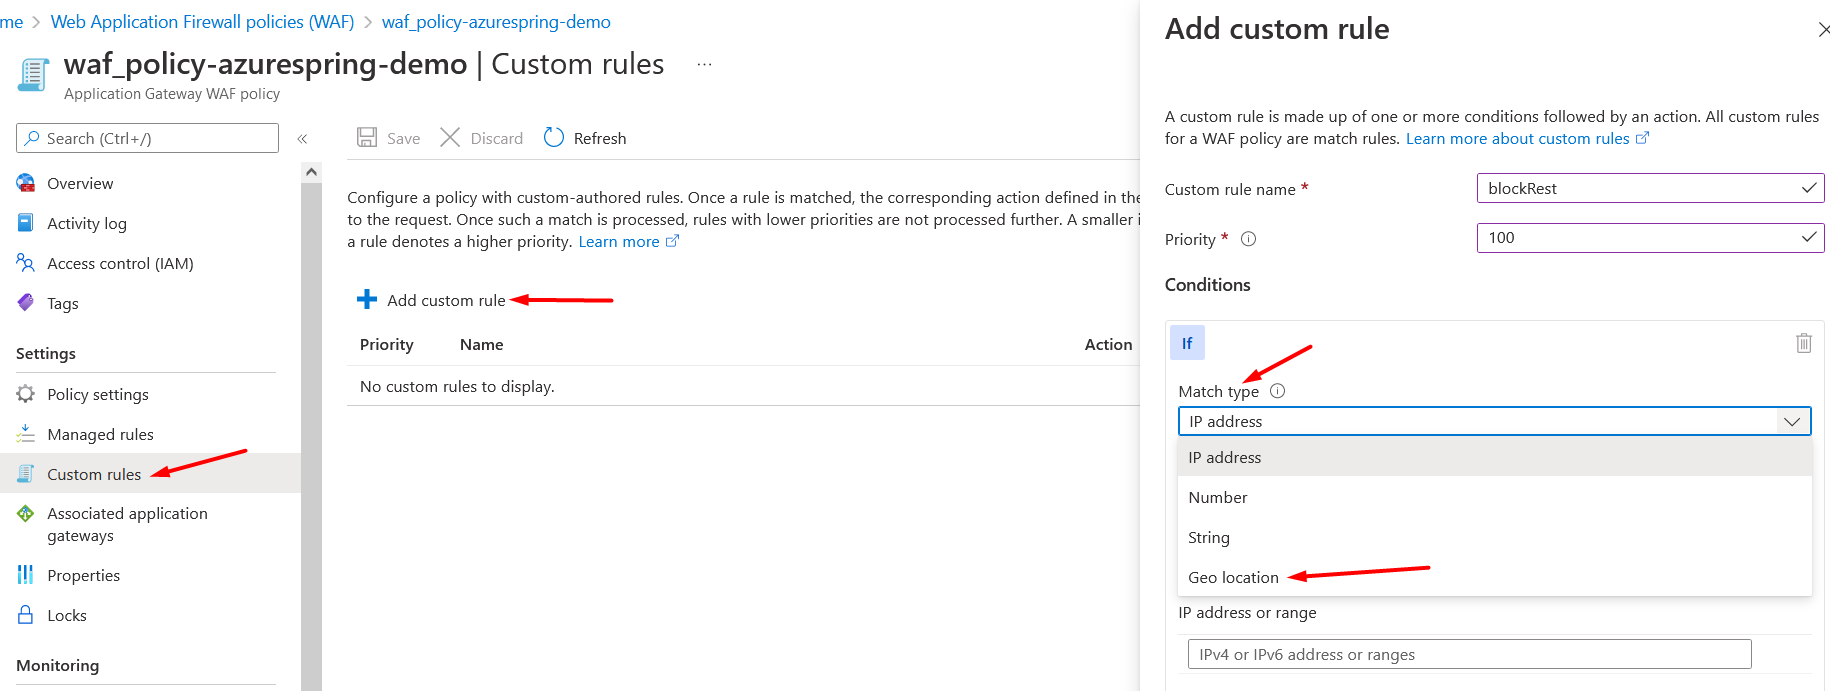
Now, we’ve WAF policy ready to create custom rule in it. Head over to WAF policy, select custom rule from the settings blade on left side. Click Add custom rule.
Under Add custom rule, simply select Geo location as the Match Type, and then select the country/region or countries/regions you want to allow/block from your application. See Figure 5.
Select RemoteAddr as the Match variable and “Is/Is not” as the Operation. Select Country/Region as shown in Figure 6.
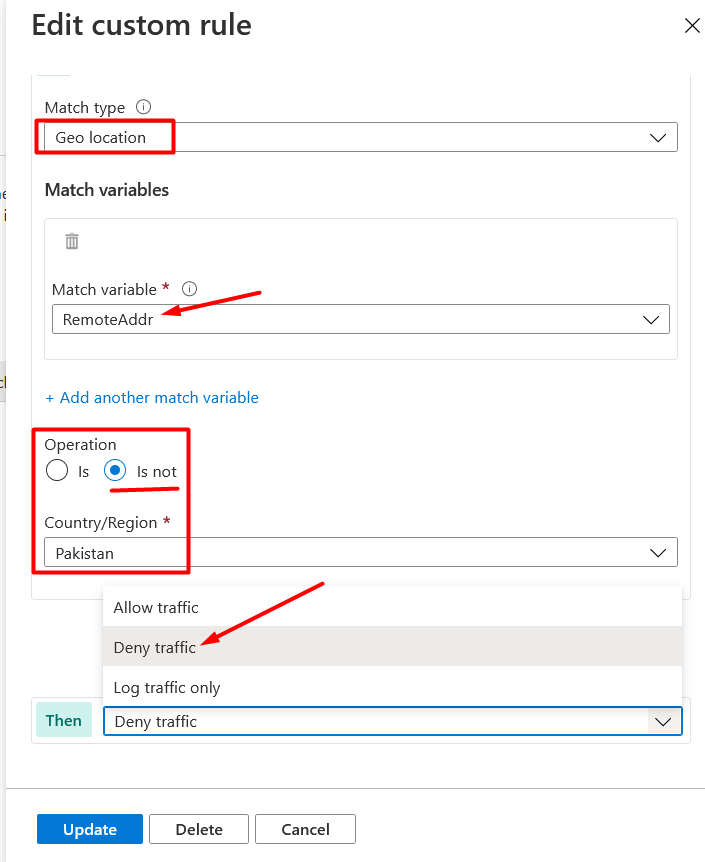
We have following three options that will take effect when the rule is matched:
- Allow traffic
- Deny traffic
- Log traffic only
In this example, we will select Deny traffic which means every request that is not from Pakistan will be blocked.
Make sure to click Save after adding custom rule.
Associate Application Gateway
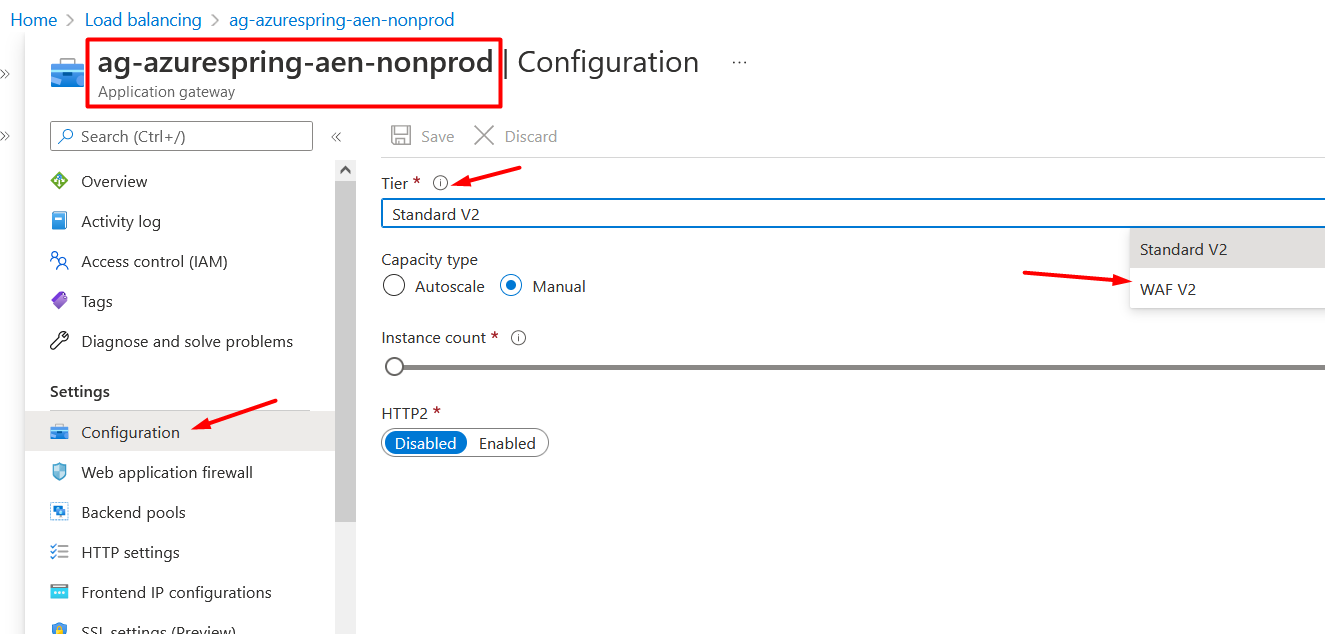
Before associating Application Gateway or Listener to this WAF policy, we need to check at what tier Application gateway is running. Return to browser window open to Azure Portal -> Go to Application gateway > Select Configuration from the settings blade on left side > Select WAF V2 as Tier (if it was not set before) > Click Save. See Figure 7.
Now, go back to WAF policy, select Associated application gateways from the settings blade on left side > Click on + (plus) button – Add association > Select HTTP Listener as shown in Figure 8.
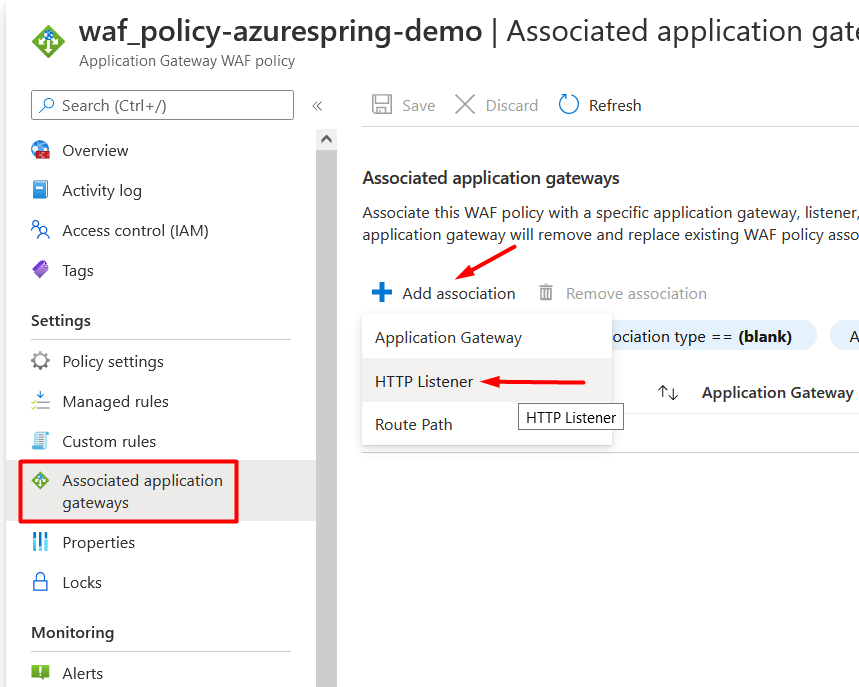
Application Gateway should appear in first field so let’s select Listener, click Add and then Save. It will take some time to go into effect after which you can call the same API again and see the results. If your location is denied in custom rule then it should block the URL and return 403 http status.
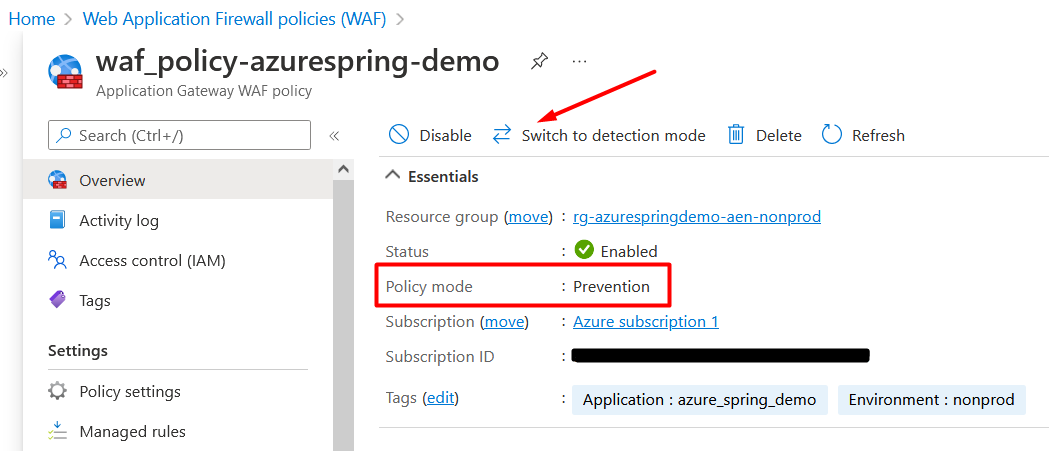
Note: Before testing the API, make sure to set the “WAF policy” switch to “Prevention mode” as shown in Figure 9.
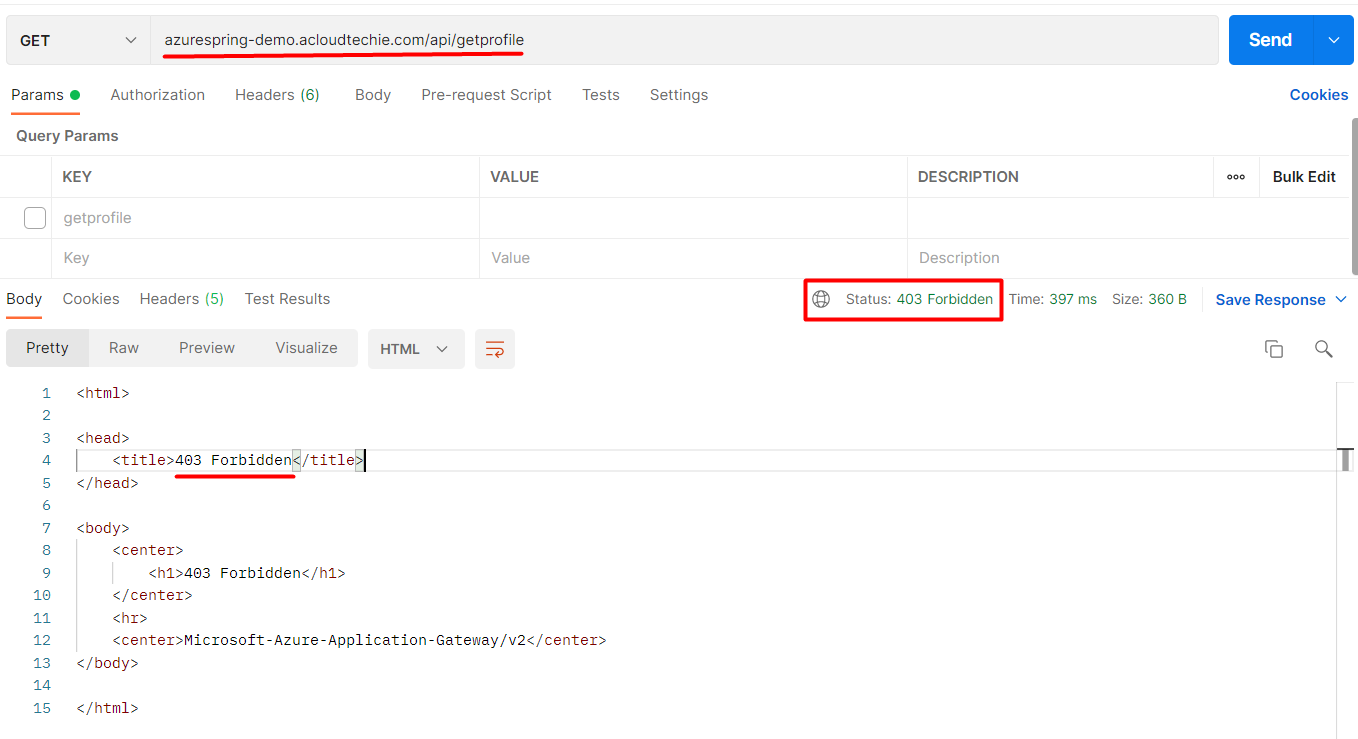
Test the functionality
Now, we are all set to see the geo-blocking (aka geo-restriction) in action. Switch to Postman and call the API again. If your location is blocked in custom rule then it will return 403 http status as shown in Figure 10.
…that’s the end of this article.
Conclusion!
In this article, we went through to know about Geo-Blocking, how it works and how we can get benefit of it using WAF with Application Gateway in Azure. We also saw the geo-blocking in action.
Thank you for reading!
Hi Muhammad,
Have one query on geo location action, whats the different in below. Log Traffic only and Allow Traffic both work same right
Allow traffic
Deny traffic
Log traffic only
Hi Dinesh,
While “Allow Traffic” and “Log Traffic Only” might seem similar because they both permit traffic to flow, they serve different purposes. “Allow Traffic” grants access without additional monitoring, whereas “Log Traffic Only” allows access but records the traffic for analysis. Therefore, they do not function identically.